
I will never forget the frantic Tuesday night dinner party four years ago that nearly convinced me to ban whole chicken breasts from my oven for the rest of my days.
I had been scrolling through gorgeous food photography all morning and was seduced by the idea of making glazed “Hasselback” chicken. The concept sounded brilliant: take thick, plump chicken breasts, make deep accordion-style crosswise slits across the top, stuff the pockets with aromatics, brush everything in a sticky, sweet-and-savory honey garlic glaze, and roast them in a heavy cast-iron baker until glistening, charred around the edges, and bursting with flavor.
It sounded so effortless that I figured I could just wing the technique.
I grabbed four cold chicken breasts straight from the supermarket styrofoam tray, took a dull chef’s knife, and hacked deep slits across each piece. On half of the breasts, my knife slipped and cut completely through the bottom, splitting the meat into awkward, floppy chunks.
Then came the fatal mistake: I whisked honey, brown sugar, soy sauce, and garlic together, slathered the thick, sugary glaze all over the raw chicken, and shoved the cast-iron pan into a scorching 425°F oven.
Twenty-five minutes later, the smoke alarm in my hallway was screeching at full blast.
When I yanked the oven door open through a cloud of acrid grey smoke, dinner was an unmitigated disaster. Because high-sugar honey burns at temperatures above 325°F, the glaze on the top of the chicken had scorched into a bitter, blackened, carbonized shell.
Worse, the heavy sugar crust had trapped steam inside the raw meat: while the outside was charred black, the thickest part of the chicken center was still raw and rubbery. And the cuts I had sliced too deep? All their internal juices had drained into the bottom of the pan, burning into sticky, burnt-sugar tar on the cast iron. Chewing the edible pieces felt like gnawing on sweetened shoe leather. We ended up ordering takeout at 8:45 PM while all the windows in our house were propped wide open in the freezing cold.
That flop bugged me for weeks. Hasselback chicken is one of the most visually stunning, flavor-packed meals you can put on a dining table. By slicing accordion slits across the breast, you massively increase the surface area, allowing sweet garlic butter and savory pan juices to penetrate deep into the core of the meat rather than just sitting on top.
The secret comes down to three simple kitchen mechanics: mastering the chopstick cutting guard so you never slice through the base, roasting the chicken seasoned with oil and butter first so the meat cooks gently without burning, and applying the sticky honey garlic glaze in two concentrated lacquering stages during the final ten minutes of cooking.
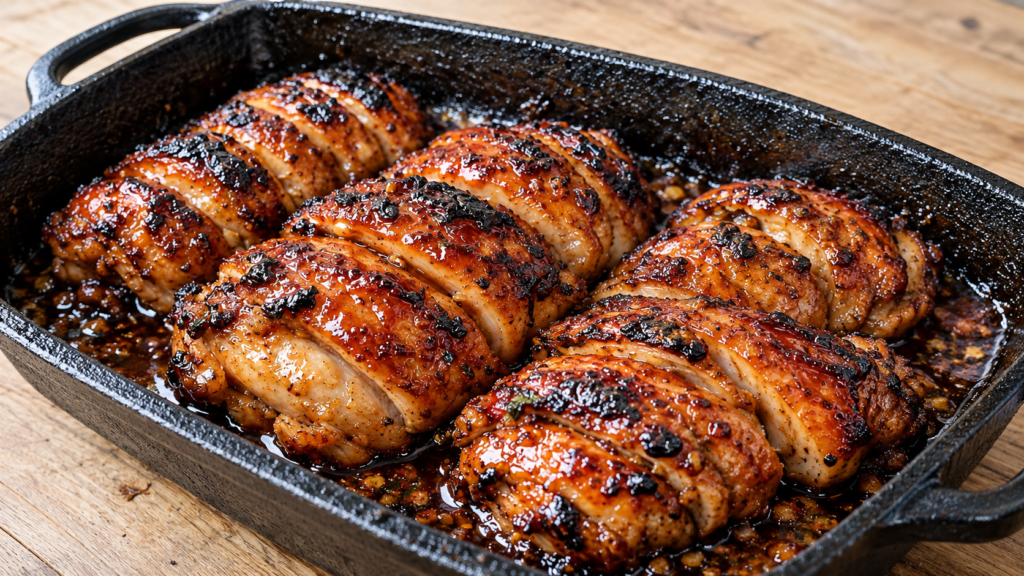
The photo above is the hard-won standard on my wooden kitchen table: four plump, accordion-scored chicken breasts roasted to deep mahogany perfection in a heavy black cast-iron baking dish, glistening in a caramelized garlic-butter reduction with crispy, blistered charred edges and juicy, tender white meat inside.
Here is how you make foolproof Sticky Honey Garlic Butter Hasselback Chicken at home without drying out your meat or burning your glaze.
Why Hasselback Chicken Breasts Go Wrong (The Science)
Boneless, skinless chicken breast is the leanest, most unforgiving cut of poultry. When you increase its surface area with deep cuts, standard roasting habits will punish you:
1. The Slicing-Too-Deep Disaster
A proper Hasselback cut requires slicing roughly two-thirds to three-quarters of the way through the meat, leaving the bottom base completely intact. If you cut all the way through, the breast splits apart into separate strips. The tension in the muscle fibers collapses, and all the natural internal moisture gushes out onto the pan. Using two wooden chopsticks or wooden spoons as blade stops on either side of the meat prevents your knife from ever cutting through the base.
2. The Sugar Scorching Trap
Pure honey, maple syrup, and brown sugar contain simple fructose and glucose that undergo rapid caramelization and pyrolysis (burning) between 320°F and 350°F. Chicken breast takes roughly 22 to 28 minutes to roast to a safe 165°F. If you paint a sugary glaze onto raw chicken at the start of a 400°F roast, the sugar will burn black long before the interior meat cooks through. You must roast the chicken naked (seasoned only with oil, butter, and dry spices) for the first 15 to 18 minutes, and only apply the sweet glaze during the final stretch so it caramelizes into a glossy lacquer without scorching.
3. Cast-Iron Heat Distribution
Baking chicken in a cold glass or thin aluminum dish often leads to pale, soggy bottoms sitting in watery broth. A preheated or heavy cast-iron baking dish conducts intense, radiant heat directly to the base of the chicken. As the butter, garlic, and natural juices drip into the slits and down into the pan, the cast iron sizzles those drippings into a concentrated pan sauce that constantly bastes the underside of the meat.
Ingredients & Tools You’ll Need
Essential Gear
- 10- to 12-Inch Heavy Cast-Iron Roaster or Skillet: (A sturdy rectangular or oval cast-iron baker, like the black pan in the photo, holds heat evenly and caramelizes the pan juices).
- Two Wooden Chopsticks or Wooden Spoon Handles: Placed flat alongside the chicken breast to act as physical depth-stops for your knife blade.
- Sharp Chef’s Knife or Santoku: A razor-sharp blade cuts cleanly through raw chicken breast without dragging or tearing the delicate flesh.
- Digital Instant-Read Meat Thermometer: (A ThermoWorks ThermoPop or similar digital probe is mandatory; pull the chicken at 160°F to avoid rubbery meat).
- Silicone Basting Brush: For lacquering the warm honey garlic glaze into every scored crevice.
The Ingredient Breakdown
| Component | Ingredient | Quantity | Practical Role |
| The Star Poultry | Large Boneless, Skinless Chicken Breasts | 4 breasts (approx. 8–10 oz each, 2 to 2.5 lbs total) | Plump, thick breasts hold deep accordion slits without tearing. |
| The Roasting Fat | High-Smoke-Point Oil & Melted Butter | 1 tbsp olive oil, 2 tbsp unsalted butter (divided) | Keeps the exterior succulent and promotes golden roasting. |
| The Dry Rub | Garlic Powder, Smoked Paprika, Onion Powder | 1 tsp each | Forms an initial savory, golden crust before the glaze is applied. |
| The Sweet Core | Pure Raw Honey | ⅓ cup | The sweet, sticky backbone that caramelizes into a glossy lacquer. |
| Aromatic Engine | Fresh Garlic Cloves | 6 to 8 cloves (finely minced) | Sizzles in the pan butter, infusing sweet garlic aroma into the cuts. |
| Savory Balance | Low-Sodium Soy Sauce or Tamari | 2 tbsp | Delivers deep umami salinity that cuts through the rich honey. |
| Acid Lift | Apple Cider Vinegar (or Fresh Lemon Juice) | 1.5 tbsp | Crucial fruity acidity that prevents the honey glaze from tasting cloying. |
| Warm Accent | Crushed Red Pepper Flakes | ½ tsp (to taste) | Adds subtle back-of-the-throat warmth that balances the sweet garlic. |
| Sauce Binder | Dijon Mustard | 1 tsp | Mild emulsifier that keeps the honey, butter, and soy sauce bound together. |
| Base Seasoning | Coarse Kosher Salt & Black Pepper | 1.5 tsp salt, 1 tsp coarse cracked black pepper | Crucial seasoning across the interior slits and pan drippings. |
| Fresh Finish | Fresh Parsley or Chives | 2 tbsp (finely chopped) | Sprinkled over the sizzling hot chicken for vibrant green color. |
Step-by-Step Cooking Instructions
Step 1: Prep and Dry the Chicken
Take your four chicken breasts out of the refrigerator 20 to 25 minutes before cooking to take the deep chill off.
Trim away any ragged edges, stray cartilage, or loose white tendons.
Pat every breast completely bone-dry on all sides using paper towels.
Moisture on the skin will steam the meat rather than letting the spices and butter cling to the surface.
Step 2: The Chopstick Slicing Trick (The Hasselback Cut)
Lay one dried chicken breast flat on your cutting board.
Place two wooden chopsticks (or two wooden spoon handles) flat on the cutting board, snugly flanking the chicken breast on both sides.
Using your sharp chef’s knife, make parallel crosswise cuts across the top of the breast, spacing the slits roughly ½-inch apart (just like the neat accordion cuts seen in the reference photo).
Cut straight down through the meat until the heel and tip of your knife blade hit the wooden chopsticks.
Why This Trick Works: The chopsticks stop your blade from cutting through the bottom quarter-inch of the meat. You end up with deep, beautiful pockets that open up like an accordion when bent, while the solid base keeps the whole breast firmly bound together. Repeat with all four breasts.
Step 3: Season the Pockets and Base Roast
Preheat your oven to 400°F (200°C).
Lightly grease your cast-iron baking dish with 1 tablespoon of olive oil.
In a small ramekin, mix together the garlic powder, onion powder, smoked paprika, 1.5 teaspoons of coarse kosher salt, and 1 teaspoon of cracked black pepper.
Arrange the four scored chicken breasts snugly side-by-side in your cast-iron dish.
Using your fingers, gently pry open each slit and rub the dry spice blend generously into the interior crevices as well as over the top and bottom surfaces.
Drizzle 1 tablespoon of melted butter over the tops of the breasts, making sure a few drops run down into the cuts.
Slide the cast-iron pan into your preheated 400°F (200°C) oven on the center rack.
Bake untouched for 16 to 18 minutes.
During this initial roast, the meat fibers cook gently, the exterior firms up, and the slits naturally fan open, preparing the chicken to receive the sticky glaze without any raw poultry moisture diluting the sauce.
Step 4: Whisk the Sticky Honey Garlic Glaze
While the chicken undergoes its initial bake, make the glaze on your stovetop:
Place a small saucepan over medium-low heat.
Add the remaining 1 tablespoon of butter, 6 to 8 cloves of finely minced fresh garlic, and ½ teaspoon of red pepper flakes.
Sauté gently for 60 to 90 seconds until the garlic is fragrant, soft, and sizzling. Do not let it brown!
Whisk in:
- ⅓ cup pure raw honey
- 2 tablespoons low-sodium soy sauce
- 1.5 tablespoons apple cider vinegar
- 1 teaspoon Dijon mustard
Bring the glaze to a gentle simmer.
Let it bubble for 2 to 3 minutes, stirring constantly with a small whisk, until the honey melts completely and the sauce thickens into a glossy, dark amber syrup.
Remove from heat.
Step 5: The Two-Stage Glaze Lacquer
At the 18-minute mark, carefully pull the cast-iron pan out of the oven using heavy heatproof mitts and set it on your stove.
The chicken will be partially cooked (around 135°F to 140°F internal), the accordion cuts will be spread wide, and savory juices will be bubbling in the pan.
Using your silicone pastry brush, spoon and paint half of the warm honey garlic glaze generously over the chicken breasts.
Make sure you dab the brush deep into each accordion pocket so the sweet, garlicky sauce coats the inside walls of the meat.
Slide the pan back into the oven for 5 minutes.
The oven heat will bake the glaze directly into the surface, turning it tacky and sticky.
Pull the pan out one more time.
Brush the remaining half of the glaze over the chicken, letting the excess drip down into the sizzling cast-iron pan where it mingles with the rendered butter and chicken drippings.
Step 6: The Golden Caramelization & Broiler Char
Switch your oven setting to BROIL (High).
Keep the cast-iron pan on the middle rack (roughly 6 to 8 inches below the heat element).
Watch through the oven window like a hawk for 2 to 3 minutes.
The direct radiant broiler heat will cause the honey sugars to bubble violently, puff up, and caramelize into those gorgeous, dark-mahogany, blistered charred edges visible along the top ridges in the reference photo.
Insert your digital instant-read thermometer into the thickest center of the largest breast:
- Target Reading: 160°F (71°C).
The moment your thermometer hits 160°F, pull the cast-iron pan out of the oven immediately.
Step 7: The Mandatory 5-Minute Rest and Baste
Set the hot cast iron onto a heatproof wooden board or trivet.
The Golden Rule: Do not cut into or serve these chicken breasts right away!
Straight out of the oven, the muscle fibers are contracted under intense thermal pressure, and the sugary glaze is molten hot.
If you pierce the chicken immediately, all the internal juices will rush out onto the pan, leaving the interior meat dry and fibrous.
Let the chicken rest undisturbed in the pan for 5 to 7 full minutes.
During this short pause:
- Carryover heat gently coasts the internal temperature to a perfectly safe, succulent 165°F (74°C).
- The relaxed meat fibers reabsorb their internal juices, guaranteeing an exceptionally tender bite.
- The bubbling garlic butter and honey glaze in the bottom of the cast iron cools down into a thick, spoon-coating pan jus.
Take a large metal spoon and scoop the bubbling, caramelized garlic-butter juices from the bottom of the pan, basting it generously over the tops and into the cuts of each chicken breast.
Scatter finely chopped fresh parsley across the sizzling pan for a bright pop of green contrast.
Serve hot straight from the rustic cast-iron roaster!
Practical Troubleshooting & Common Mistakes
- “My glaze burned black and tasted bitter.”
This is the universal consequence of applying the honey glaze at the very beginning of the 25-minute roast. Honey contains delicate sugars that burn quickly under dry heat. Always roast the chicken naked for the first 16 to 18 minutes, and only apply the glaze during the final 7 to 8 minutes of baking and broiling. - “The chicken breasts turned out dry and chalky.”
This happens if you relied on the clock instead of a digital meat thermometer. Chicken breast dries out rapidly once it passes 165°F. Pull the pan from the oven when the thickest part reads 160°F, and let carryover heat during the 5-minute rest finish the job to 165°F. - “The breasts fell apart into separate pieces.”
You cut too deep! Always place chopsticks, wooden skewers, or wooden spoon handles flat on either side of the chicken breast while slicing to act as depth stops. Never let your knife cut through the bottom quarter-inch of the meat.
Delicious Upgrades & Variations
While this sticky honey garlic butter glaze is unbeatable, the Hasselback technique is wonderfully adaptable to different culinary styles:
- The Cheesy Caprese Hasselback: Stuff the sliced pockets with fresh mozzarella rounds, ripe Roma tomato slices, and fresh basil leaves. Drizzle with balsamic glaze right after roasting.
- The Smoky Bacon Cheddar Version: Tuck small squares of sharp cheddar cheese and par-cooked crispy bacon into each pocket. Brush with your favorite smoky barbecue sauce during the final eight minutes of cooking.
- The Spicy Sriracha Honey Kick: Whisk 1 tablespoon of Sriracha chili sauce and a teaspoon of freshly grated ginger into the honey garlic glaze for an addictive, fiery Asian-fusion punch.
What to Serve with Honey Garlic Hasselback Chicken
This chicken is savory, sweet, and creates plenty of concentrated garlic-butter pan drippings in the bottom of the cast iron, making it the ultimate partner for simple, absorbent sides:
- Steamed Jasmine Rice or Garlic Butter Rice: The undisputed champion. Spooning the sticky, caramelized pan juices and tender chicken directly over a fluffy bowl of hot rice is pure weeknight luxury.
- Roasted Asparagus or Steamed Broccoli: Crisp-tender green vegetables tossed with a squeeze of fresh lemon juice provide a clean, snappy, acidic contrast that balances the rich honey glaze.
- Creamy Garlic Mashed Potatoes: Fluffy Yukon Gold mashed potatoes provide a comforting bed that catches every drop of sweet garlic butter running off the chicken.
- Crispy Green Salad: A simple side salad of baby greens, sliced cucumbers, and radishes tossed in a sharp vinaigrette cleanses the palate between rich bites.
Storing and Reheating Leftovers (The Non-Dry Technique)
If you have leftover glazed chicken breasts, let the cast-iron pan cool to room temperature.
Transfer the chicken along with all the caramelized pan juices into an airtight glass container and store in the refrigerator for up to 4 days.
Never reheat Hasselback chicken in the microwave on high power! The microwave’s intense radiation will cook the lean chicken breast fibers past their moisture limit, turning the meat into rubbery leather while melting the sticky glaze into a thin, watery puddle.
Instead, use the gentle oven or skillet method:
- Place the leftover chicken breast and its pan juices into a small baking dish or skillet over medium-low heat.
- Splash in 1 to 2 tablespoons of chicken broth or water to loosen the chilled honey glaze.
- Cover loosely with aluminum foil to protect the top from burning.
- Warm at 350°F (175°C) for 10 to 12 minutes until heated through to the center.
- Spoon the warmed, syrupy pan juices right back over the accordion cuts before serving.
The meat stays remarkably juicy, the glaze turns glossy and sticky once again, and you get to enjoy a restaurant-level comfort meal all over again with practically zero effort!