

I will never forget the chilly Wednesday evening three autumns back that nearly made me swear off making chicken in my slow cooker for the rest of my days.
I was aiming for a rustic, French bistro-style meal: succulent chicken thighs simmered low and slow with sweet caramelized onion rings, tender whole roasted garlic cloves, and fresh herbs in a glossy, savory pan jus. In my mind, I was going to carry a steaming, aromatic crock straight to the dining table, with golden-crusted chicken thighs that looked like they had been braised by a French grandmother.
I thought I could just take the classic “dump-and-go” shortcut. I bought a family pack of bone-in, skin-on chicken thighs, laid them raw into the bottom of the black ceramic insert, tossed a sliced raw onion over the top, dumped in a whole carton of chicken broth, clamped the lid on, and set the dial to Low for six hours.
When I lifted the lid that night, my heart sank.
Instead of a deep, caramelized bistro sauce, I was staring at a pale, grey, murky puddle with an unappealing yellow slick of chicken fat floating across the surface.
Worse, because I hadn’t seared the chicken beforehand, the skin had turned into a flabby, rubbery, pale sheet that tore off the bone like wet tissue paper. The onions hadn’t caramelized into sweet ribbons at all; they had boiled into translucent, bitter strings. When my partner took a bite, the meat was edible, but it lacked any real depth or savory punch—it just tasted like boiled chicken stewed in salted water. We picked at the meat, left the rubbery skin on the side of our plates, and I spent twenty minutes skimming chicken fat out of my slow cooker insert, completely disappointed.
That messy dinner forced me to study how poultry skin and aromatics behave inside a sealed, high-humidity crock.
Chicken thighs are packed with natural flavor and rich connective tissue, making them one of the absolute best cuts for braising. But chicken skin cannot render or brown in steam. Onions will never caramelize without direct heat. And a slow cooker does not evaporate liquid—it traps it.
Once I learned to give the seasoned chicken thighs a blistering skillet sear to render the fat and build a crackling crust, sauté the onion rings in the pan drippings to unlock their natural sugars, and add whole peeled garlic cloves that melt into sweet garlic butter, the entire recipe transformed.
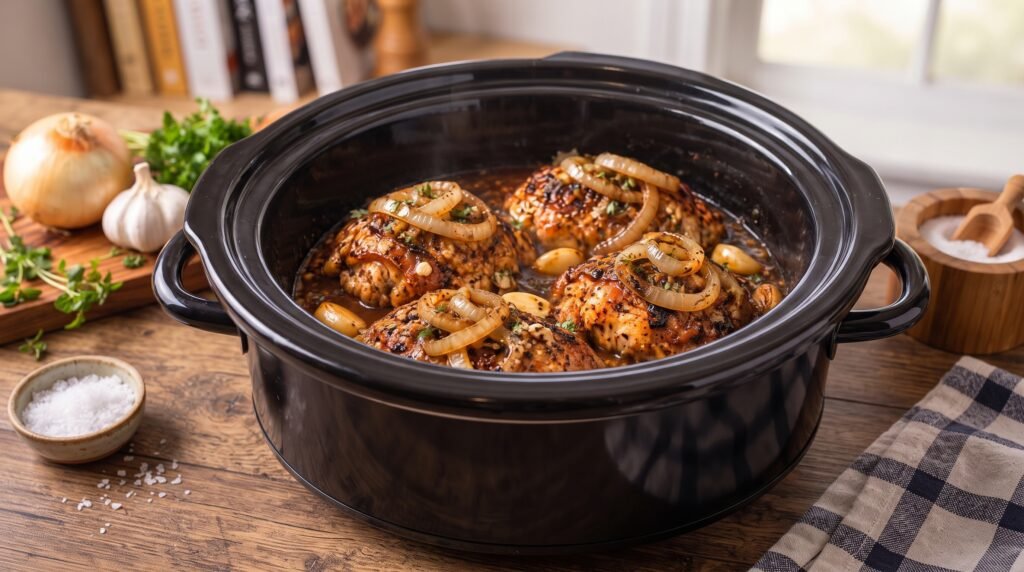
The photo above is the hard-won standard on my kitchen counter: four plump, deeply browned bone-in chicken thighs nestled in a rich, bubbling garlic-herb pan jus, crowned with tender caramelized onion rings, melt-in-your-mouth whole garlic cloves, and fresh flecks of parsley inside a glossy black slow cooker.
Here is how you recreate these restaurant-quality, melt-in-your-mouth French Onion Garlic Herb Chicken Thighs at home without ever facing flabby skin or a watery sauce again.
Why Slow-Cooker Chicken Thighs Go Wrong (The Moisture & Fat Science)
Cooking skin-on chicken and alliums inside a sealed slow cooker is a lesson in moisture management. If your chicken dinners have ever turned out greasy or bland, here is what happened behind the scenes:
1. The Flabby Skin Paradox
Chicken skin contains a high percentage of subcutaneous fat and water. To turn crisp and golden, that fat must render out and the surface moisture must evaporate at temperatures above 300°F (150°C). Inside a slow cooker, the air stays around 200°F (93°C) under nearly 100% humidity. If you place raw, unseared chicken skin inside, it will simply boil and gelatinize into a rubbery layer. Searing the skin hard in a hot skillet for 5 to 6 minutes renders out the greasy excess fat and locks in a dark, crispy Maillard crust that holds up during the gentle braise.
2. Boiling vs. Caramelizing Onions
Raw onions are sharp and astringent because of their natural sulfur compounds. When you sauté onions over medium heat, their cellular structure breaks down and their natural sugars undergo caramelization, turning them sweet, jammy, and golden. If you throw raw sliced onions directly into a slow cooker with broth, they boil instead of caramelizing, leaving your cooking liquid thin, sharp, and watery. Spending five minutes sweating the onion rings in the savory chicken drippings first creates the foundation of that rich, French-onion-style flavor.
3. The Condensation Flood
A slow cooker allows zero evaporation. Chicken thighs naturally release roughly 20% to 25% of their weight in moisture as they cook. If you pour two cups of broth into the crock, you end up with a diluted soup. You only need ½ to ¾ cup of concentrated, highly seasoned broth; the rendered chicken juices, sweet onions, and melting whole garlic cloves will naturally create plenty of rich, savory gravy without drowning the meat.
Ingredients & Tools You’ll Need
Essential Kitchen Gear
- 6- to 7-Quart Oval Slow Cooker: (A ceramic slow cooker, like the black unit in the photo, provides a wide, flat footprint so four to six large chicken thighs can sit flat in a single layer without overlapping).
- 12-Inch Heavy Cast-Iron or Stainless Skillet: Mandatory for rendering the chicken skin and searing it into a crisp, deep golden crust.
- Large Metal Tongs: For flipping sizzling chicken thighs without tearing the delicate skin.
- Flat Wooden Spatula: Essential for scraping up the savory caramelized chicken fond from the bottom of the skillet during deglazing.
- Digital Instant-Read Meat Thermometer: (A ThermoWorks ThermoPop or similar digital probe ensures your chicken thighs hit that tender, gelatinized sweet spot of 175°F to 185°F).
The Ingredient Breakdown
| Component | Ingredient | Quantity | Practical Role |
| The Star Poultry | Bone-In, Skin-On Chicken Thighs | 4 large thighs (approx. 2 to 2.5 lbs total) | Juicier than breasts; connective tissue turns silky during a slow braise. |
| The Searing Fat | High-Smoke-Point Oil | 1 tbsp (avocado or olive oil) | Promotes an initial hard sear while the chicken fat begins to render. |
| Aromatic Ribbons | Sweet Yellow Onions | 2 large (sliced into thick ½-inch rings) | Caramelizes into sweet ribbons that drape over the finished chicken. |
| The Melted Gems | Whole Fresh Garlic Cloves | 10 to 12 whole cloves (peeled) | Simmers whole in the broth until buttery, sweet, and spreadable. |
| Aromatic Mince | Fresh Garlic | 4 cloves (finely minced) | Infuses the pan jus with robust, savory garlic depth. |
| The Deglazer | Dry White Wine (or extra broth) | ⅓ cup (Pinot Grigio or Sauvignon Blanc) | Cuts through the rich chicken fat and lifts caramelized fond. |
| The Savory Base | Low-Sodium Beef or Chicken Bone Broth | ¾ cup | Rich savory foundation; beef bone broth gives that deep French onion color. |
| Umami Engine | Worcestershire Sauce | 1.5 tbsp | Adds fermented, savory depth that balances the sweet onions. |
| Richness Booster | Better Than Bouillon Roasted Chicken Base | 1 tsp | The secret weapon for deep rotisserie-style flavor. |
| Tomato Anchor | Tomato Paste | 1 tbsp | Blooms in the pan drippings to add color and subtle acidity. |
| Herbal Backbone | Fresh Thyme & Dried Rosemary | 1 tbsp fresh thyme leaves, ½ tsp crushed rosemary | Traditional bistro herbs that perfume the pan gravy. |
| Chicken Rub | Garlic Powder, Onion Powder, Smoked Paprika | 1 tsp garlic powder, 1 tsp onion powder, ½ tsp paprika | Seasoning blend that builds a savory, golden-red crust during the sear. |
| Base Seasoning | Coarse Kosher Salt & Coarse Black Pepper | 1.5 tsp salt, 1 tsp coarse cracked black pepper | Crucial seasoning across the chicken skin and pan sauce. |
| Sauce Thickener | Cornstarch Slurry (Optional) | 1 tbsp cornstarch + 1 tbsp cold water | Quickly thickens the pan jus into a glossy, spoon-coating sauce. |
| Fresh Finish | Fresh Flat-Leaf Italian Parsley | 2 tbsp (finely chopped) | Sprinkled across the hot chicken for color and herbal brightness. |
Step-by-Step Cooking Instructions
Step 1: Trim and Season the Chicken Thighs
Take your chicken thighs out of the refrigerator 20 to 25 minutes before cooking to take the chill off.
Cold meat placed into a hot skillet drops the surface temperature instantly, causing the skin to stick and steam rather than crisp.
Inspect the underside of each chicken thigh.
Use kitchen shears or a sharp knife to trim away any wide, flabby flaps of excess skin or loose yellow fat that hang past the edges of the meat.
Leave the main skin cap firmly intact across the top!
Pat the chicken thighs completely bone-dry on both sides with paper towels.
Moisture is the enemy of a crisp sear.
In a small bowl, whisk together the garlic powder, onion powder, smoked paprika, 1.5 teaspoons of coarse kosher salt, and 1 teaspoon of freshly cracked black pepper.
Rub the seasoning blend evenly all over the chicken, making sure to season both the meaty underside and the skin.
Step 2: The Hard Cast-Iron Skin Sear (The Non-Negotiable Step)
Place your 12-inch heavy skillet over medium heat on the stovetop.
Add 1 tablespoon of oil.
Once the oil shimmers, lay the chicken thighs into the skillet skin-side down.
You should hear a gentle, steady sizzle.
The Golden Rule of Searing Chicken Skin: Do not touch or move them for 5 to 6 full minutes!
Keep the heat at medium.
You want moderate, steady heat so the subcutaneous fat under the skin slowly liquefies and renders into the pan, allowing the skin to shrink, tighten, and turn a deep, crackling golden-mahogany color.
If you try to flip them too early, the delicate skin will tear and stick to the metal.
When the skin releases easily from the pan, use your metal tongs to flip the thighs over.
Sear the meaty underside for 2 minutes just to lock in flavor.
Transfer the seared chicken thighs to a clean plate.
Do not clean the skillet!
Step 3: Caramelize the Onion Rings and Whole Garlic
Look into your skillet: you will see fragrant rendered chicken fat and dark brown fond stuck to the bottom.
Carefully spoon off all but about 1.5 tablespoons of the rendered fat.
Turn the burner to medium.
Drop your thick sliced onion rings into the skillet with a pinch of kosher salt.
Cook for 5 to 6 minutes, stirring occasionally with your flat wooden spatula, until the onion rings soften, separate, and begin turning golden-amber around the edges.
Toss in the 10 to 12 whole peeled garlic cloves, the 4 minced garlic cloves, and the 1 tablespoon of tomato paste.
Cook for another 90 seconds, stirring constantly, until the minced garlic is fragrant and the tomato paste darkens to a brick-red glaze.
Step 4: Deglaze the Pan Fond
Pour the ⅓ cup of dry white wine (or a splash of broth) directly into the hot skillet.
The liquid will bubble vigorously.
Use your flat wooden spatula to scrape firmly along the bottom and corners of the skillet, loosening all the flavorful, caramelized chicken fond stuck to the metal.
Let the wine simmer for 2 minutes until it reduces by about half and the alcohol fumes cook off.
Pour in the ¾ cup of bone broth, 1.5 tablespoons of Worcestershire sauce, 1 teaspoon of Better Than Bouillon chicken base, fresh thyme leaves, and crushed rosemary.
Stir until the bouillon dissolves completely and the mixture comes to a gentle simmer.
Remove the skillet from the heat source.
Step 5: Assemble and Load the Slow Cooker
Take your 6-quart oval slow cooker insert.
- The Onion & Garlic Bed: Use a slotted spoon or tongs to transfer about two-thirds of the softened onion rings and all of the whole garlic cloves from the skillet into the bottom of the slow cooker, spreading them into an aromatic bed.
- Nestle the Chicken: Arrange the four seared chicken thighs in a single, snug layer directly on top of the onions, skin-side facing UP.
- The Crown: Spoon the remaining caramelized onion rings directly over the tops of the chicken thighs (exactly as seen in the reference photo).
- Pour the Sauce: Carefully pour the warm, seasoned skillet broth into the bottom of the slow cooker around the edges of the chicken.
Important Visual Check: Do not pour the liquid directly over the crispy chicken skin! Pour it around the sides into the base. The liquid should come about halfway up the sides of the chicken. The tops of the thighs and their caramelized skins should sit high and dry above the broth.
Step 6: The Low-and-Slow Braise
Clamp the heavy lid onto the slow cooker.
- Low Setting (Strongly Recommended): Cook for 4 to 5 hours.
- High Setting: Cook for 2.5 to 3 hours.
Cook’s Real-Life Tip: While chicken breasts dry out past 165°F, bone-in chicken thighs thrive when cooked to 175°F to 185°F (80°C to 85°C). At this higher internal temperature, the tough connective tissue surrounding the thigh bone completely melts into rich gelatin, turning the meat fall-apart tender and juicy.
Around the 4-hour mark on Low, test a thigh: the meat should pull away easily from the bone with a fork, and the whole garlic cloves in the sauce should be soft enough to crush with the back of a spoon.
Step 7: The Optional Broiler Crisp & Gravy Glaze
If you love your chicken skin extra crackling and deeply caramelized (just like the blistered edges shown in the photo), take this quick extra step:
- Carefully transfer the cooked chicken thighs using a wide spatula onto a rimmed baking sheet.
- Slide them under your oven’s BROIL (High) setting for 2 to 3 minutes until the skin sizzles, bubbles, and turns deeply crisp and bronzed.
Meanwhile, check the sauce left in the slow cooker:
- If you want a thicker, spoon-coating pan gravy, turn the slow cooker to HIGH.
- Whisk 1 tablespoon of cornstarch with 1 tablespoon of cold water, stir it into the bubbling broth, and let it simmer uncovered for 5 to 8 minutes until glossy and velvety.
Nestle the crisped chicken thighs back into the bubbling sauce in the slow cooker for table presentation.
Step 8: Garnish, Rest, and Table Service
Switch your slow cooker to the “WARM” setting.
Scatter finely chopped fresh Italian flat-leaf parsley across the chicken thighs and throughout the bubbling pan jus.
Let the dish rest for 5 full minutes before serving.
This brief pause lets the boiling bubbles settle and allows the succulent chicken fibers to relax and pull the savory pan juices back into the meat.
Serve warm directly from the rustic slow cooker, spooning plenty of the sweet caramelized onion rings, soft whole garlic cloves, and velvety pan jus over each portion!
Practical Troubleshooting & Common Mistakes
- “My chicken skin turned soft and rubbery.”
This happens if you skip searing the skin beforehand, or if you submerge the chicken completely in liquid. Always render the skin in a hot skillet for 5 to 6 minutes first, and always arrange the thighs in the slow cooker with the skin facing up, sitting above the broth line. - “The sauce is greasy on top.”
Chicken thighs naturally release flavorful chicken fat as they braise. If a clear yellow slick pools on top of the sauce, take a shallow metal spoon and gently skim the surface fat off the broth before serving or adding the cornstarch slurry. - “The garlic cloves broke apart into mush.”
Leave the garlic cloves completely whole! Crushing or slicing them causes them to dissolve into the liquid during a 4-hour braise. Leaving them whole allows them to confit slowly in the chicken fat and broth, turning into sweet, intact little flavor nuggets that melt in your mouth.
Delicious Upgrades & Variations
While this classic French onion, garlic, and herb profile is the ultimate comfort standard, you can easily adapt the dish to match what you have on hand:
- The Cheesy Gruyère Gratin Finish: After slow cooking, transfer the chicken thighs and onions to an oven-safe dish, drape thick slices of Gruyère or Swiss cheese over each piece, and broil for 2 minutes until bubbling and golden-brown like traditional French onion soup.
- The Button Mushroom Addition: Sauté 8 ounces of halved cremini mushrooms alongside the onions in Step 3 and add them to the slow cooker for an earthy, savory forest-style braise.
- The Creamy Dijon Twist: Stir 2 tablespoons of heavy cream and 1 tablespoon of whole-grain Dijon mustard into the pan jus during the final ten minutes for a rich, tangy country-French pan gravy.
What to Serve with French Onion Garlic Chicken Thighs
This dish is rich, savory, and produces an abundance of sweet onion and garlic pan gravy, making it the perfect centerpiece for absorbent sides:
- Garlic Butter Mashed Potatoes: The undisputed champion. A fluffy mound of Yukon Gold mashed potatoes creates the ultimate bed for catching every drop of that velvety onion-herb jus.
- Warm Crusty Sourdough or French Baguette: Non-negotiable! You need thick, crusty slices of bread to spread those soft, sweet braised garlic cloves onto and swipe the bottom of your bowl clean.
- Buttered Wide Egg Noodles: Toss cooked egg noodles with butter, fresh parsley, and cracked black pepper; the savory chicken broth clings to the ribbons effortlessly.
- Crisp Green Salad or Roasted Asparagus: Tender green vegetables tossed in a bright lemon vinaigrette provide a clean, acidic crunch that cuts right through the rich chicken and caramelized onions.
Storing and Reheating Leftovers
If you have leftover chicken thighs, let the slow cooker cool to room temperature.
Transfer the chicken, onions, whole garlic cloves, and pan jus into an airtight glass container and store in the refrigerator for up to 4 days.
Because chicken thighs and bone broth are rich in natural collagen, the sauce will set into a thick gelatin once chilled. This is a sign of an incredible culinary glaze!
Never reheat skin-on chicken in the microwave! The microwave’s steam will turn the skin soggy and rubbery while overcooking the meat.
Instead, use your oven or a toaster oven:
- Place the leftover chicken thighs, onions, and gravy into a small baking dish.
- Spoon the pan juices around the base of the chicken, keeping the skin exposed.
- Warm in a 350°F (175°C) oven for 12 to 15 minutes until the chicken is hot and the skin re-crisps.
- Spoon the warm garlic-onion gravy over fresh potatoes or rice, and enjoy a meal that tastes just as fresh, tender, and comforting as the night it came out of the slow cooker!