
Introduction: When a Pizza Night Ambition Goes Completely Wrong
Let me take you back to a rainy Friday night a few months ago. I wanted to blow my family away with a homemade, epic deep-dish stuffed pizza loaded with meat and cheese, inspired by those legendary Chicago-style pies. Without checking a recipe, I figured, Hey, just line a giant cake pan with dough, dump in a mountain of raw ground beef and shredded cheese, cover it with sauce, and bake it.
What followed was a culinary catastrophe.
I baked the massive pie for an hour. When I pulled it out, the top looked okay, but the second I cut into it, a flood of greasy, watery liquid poured out. Because I used raw ground beef and didn’t pre-cook the filling or drain the grease, the meat released an enormous amount of moisture that turned the bottom crust into a soggy, gluey paste. Meanwhile, the cheese inside had separated into a boiling, oily soup that completely destabilized the slice.
When my husband tried to pick up a slice, the entire thing collapsed into a messy landslide on his plate.
That kitchen catastrophe bruised my ego, but it also made me obsessed. I refused to let a deep-dish pizza defeat me. I spent the next few weeks testing, tweaking, and completely redesigning how to build a tall, sturdy dough crust, manage meat moisture, and achieve that perfect, stretchy cheese pull.
Today, I am sharing the glorious result of that journey: my absolute favorite Deep Dish Stuffed Pizza Pie. It is loaded with seasoned beef, bubbling mozzarella, pepperoni, and a buttery, golden crust that holds its shape like a dream. Grab a springform pan and let’s dive in.
The Reality Check: Why Most Homemade Deep Dish Pizzas Fall Apart
Before we get to the fun part of cooking, we need to talk about why making a towering stuffed pizza at home can feel like walking through a minefield.
Have you ever tried making a thick-crust pizza, only to find that the bottom crust is soggy and raw while the filling is watery? Or have you watched your cheese turn into a greasy puddle?
I made every single one of those mistakes so you don’t have to repeat them. Here are the three golden rules I learned the hard way:
- Pre-cook and drain your meat. Raw ground beef or sausage releases a massive amount of fat and water as it bakes. Browning and draining your meat on the stove first ensures your pizza stays rich and savory without turning into a soggy mess.
- Use a springform pan or deep cake pan. You cannot make a proper deep-dish stuffed pizza on a flat baking sheet. You need tall, vertical sides (like a 9-inch springform pan) to support the height of the crust and layers of filling.
- Layer strategically. Put a layer of cheese on the bottom crust before adding the warm meat filling. This acts as a moisture barrier so the dough stays crisp and doesn’t get soggy.
With those hard-earned lessons tucked under our aprons, let’s look at what you need to stock your kitchen counter with.
The Ingredient List
For a meal that tastes like an authentic Chicago deep-dish masterpiece, the ingredient list is surprisingly straightforward. You can find everything easily at your local grocery store.
| Category | Item | Quantity / Notes |
| The Crust | Pizza Dough (Store-Bought or Homemade) | 2 lbs (enough for a thick bottom crust and a top lid). |
| Cornmeal | 2 tablespoons (sprinkled in the pan for that authentic bakery crunch). | |
| The Filling | Ground Beef or Italian Sausage | 1.5 lbs (browned, seasoned, and drained of excess grease). |
| Bell Peppers & Onions | 1 bell pepper (diced) + 1 medium onion (diced) cooked with the meat. | |
| The Cheese & Toppings | Mozzarella Cheese | 3 cups, freshly shredded from a block (freshly grated melts much smoother than bagged). |
| Pepperoni Slices | 1 cup (layered inside and crisped on top). | |
| The Sauce | Marinara or Pizza Sauce | 1.5 cups of a thick, robust tomato sauce. |
| Finishing Touch | Parmesan & Fresh Parsley | 1/2 cup grated parmesan + 2 tbsp chopped parsley for garnish. |
Step-by-Step Guidance: Building Your Masterpiece
Ready to get to work? Make sure you have a 9-inch springform pan ready (this makes releasing the tall pizza effortless). Let’s walk through the process step by step.
Step 1: Cook the Meat Filling
- Stovetop Sauté: Place a skillet over medium-high heat. Add your ground beef (or sausage), diced bell peppers, and diced onions. Cook until the meat is thoroughly browned and the vegetables are tender.
- Drain Excess Fat: Drain the meat mixture thoroughly in a colander. Season with garlic powder, salt, and pepper. Let it cool slightly so it doesn’t melt your cheese prematurely.
Step 2: Build the Deep Crust
- Preheat your oven to 400°F (200°C). Generously grease your 9-inch springform pan with butter and dust the bottom and sides with cornmeal.
- Roll out about two-thirds of your pizza dough and press it firmly into the bottom and all the way up the sides of the springform pan, creating a deep bowl shape.
Step 3: Layer the Filling
- The Moisture Barrier: Sprinkle 1 cup of your shredded mozzarella cheese directly onto the bottom crust.
- Spoon your cooked, drained beef and vegetable filling evenly over the cheese layer. Add a layer of pepperoni slices right on top of the meat.
- Cover the filling generously with another 1.5 cups of shredded mozzarella cheese.
Step 4: The Top Crust and Sauce
- Roll out the remaining third of your pizza dough to form a round circle. Place it over the top of the stuffed filling, pinching the edges tightly together with the bottom crust to seal everything inside. Cut a small X vent in the center for steam to escape.
- Pour your thick marinara sauce evenly across the top crust, then scatter your remaining mozzarella, parmesan, and a layer of pepperoni slices across the top.
- Bake in your preheated oven for 35 to 40 minutes until the crust is golden-brown and the cheese is bubbling furiously. Let it rest for 15 minutes before releasing the springform ring!
Real Examples, Use Cases, and Life Lessons
Even seasoned home cooks run into roadblocks. Here are a few practical scenarios and common traps to keep in mind so your dinner goes off without a hitch:
- The Soggy Crust Trap: Skipping the bottom layer of cheese or failing to drain your cooked meat will result in a soggy crust. Always layer cheese directly against the dough to create a waterproof seal!
- Releasing the Pan: Using a springform pan is non-negotiable for this recipe. Trying to pry a towering 3-inch deep pie out of a regular cake pan will destroy your slices.
- Leftovers and Reheating: This pizza makes incredible leftovers. Reheat slices in a hot skillet over medium heat with a lid on for 5 minutes, or in an oven at 375°F to restore that crispy crust texture.
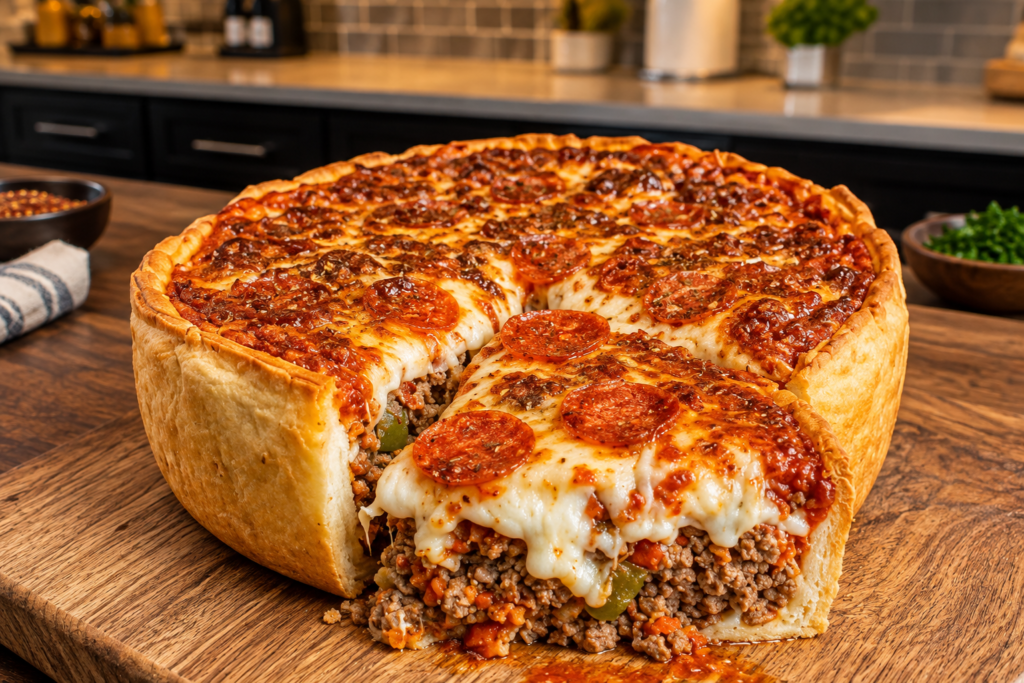
As for serving suggestions? Slice this towering masterpiece into thick wedges and serve it hot, watching that incredible cheese pull unfold just like in our reference photo. Pair it with a crisp green salad to balance out the rich, hearty pie.
Common Mistakes to Avoid Summary
To ensure your Deep Dish Stuffed Pizza Pie turns out structurally sound, cheesy, and delicious on your very first try, keep these quick checkpoints handy:
- Don’t skip draining the meat: Pre-cooking and draining your ground beef prevents excess grease from ruining the crust.
- Don’t use a standard shallow pan: Use a tall springform pan to support the towering height of a stuffed pizza.
- Don’t slice immediately: Let the pizza rest for 15 minutes after baking so the cheese sets up and holds its shape when cut.
Final Thoughts
That disastrous Friday night pizza failure feels like a lifetime ago now. Making an incredible, restaurant-quality deep-dish pizza at home isn’t about guesswork; it’s about managing your moisture levels and building proper structural layers.
Next time you want a crowd-pleasing weekend dinner that will completely blow your family away, skip the delivery app and spend 30 minutes of active prep making this Deep Dish Stuffed Pizza Pie.
Take your time, layer your cheese right, and enjoy every single cheesy, savory bite. Happy cooking!