
I will never forget the Sunday family dinner four years ago that nearly made me banish meatloaf from my kitchen repertoire forever.
I had been daydreaming all week about creating the ultimate show-stopping centerpiece: a savory, seasoned ground beef loaf stuffed down the middle with molten cheddar, wrapped tightly in a smoky jacket of overlapping bacon, and baked in a glass roasting dish until glistening, mahogany, and crisp. In my mind, I was going to carve thick slices at the table, revealing a perfect bullseye of melted, stretchy cheese encased in juicy, tender meat and crackling bacon.
I thought I could just slap it together without overthinking meatloaf physics. I shaped raw ground beef around a couple of cold string cheeses, slapped cold thick-cut bacon strips loosely over the top, shoved the glass pan into a 350°F oven, and walked away.
An hour later, dinner was an unmitigated culinary catastrophe.
The cheese had melted in the first twenty minutes, built internal steam pressure, and blown a massive blowout crater straight through the side seam of the meatloaf. Nearly all the cheese had drained into the bottom of the glass dish, scorching into a bitter, blackened puddle of dairy oil.
Worse, the thick bacon on top had never crisped up. Because meatloaf releases moisture as it bakes, the trapped steam under the bacon had boiled the pork strips into a rubbery, pale, greasy skin. When I tried to slice it, the limp bacon dragged under my knife, tearing the loaf apart into a ragged, hollow mess devoid of cheese. My partner politely ate the crumbling meat around the edges, but half the dish went straight into the trash while I spent thirty minutes scraping burnt cheese carbon off my baking dish.
That disaster forced me to spend weeks dialing in meat-to-cheese geometry.
A bacon-wrapped, cheese-stuffed meatloaf is the undisputed heavyweight champion of comfort food, but ground beef shrinkage, cheese melting thresholds, and bacon fat rendering operate on completely conflicting schedules.
The secret comes down to three repeatable kitchen rules: building a milk-soaked panko panade so the beef stays tender without shrinking violently, using block cheddar cut into a solid log and chilled firm, and wrapping the loaf in a tight, overlapping shingle pattern of regular-cut bacon that finishes under a high-heat broiler char.
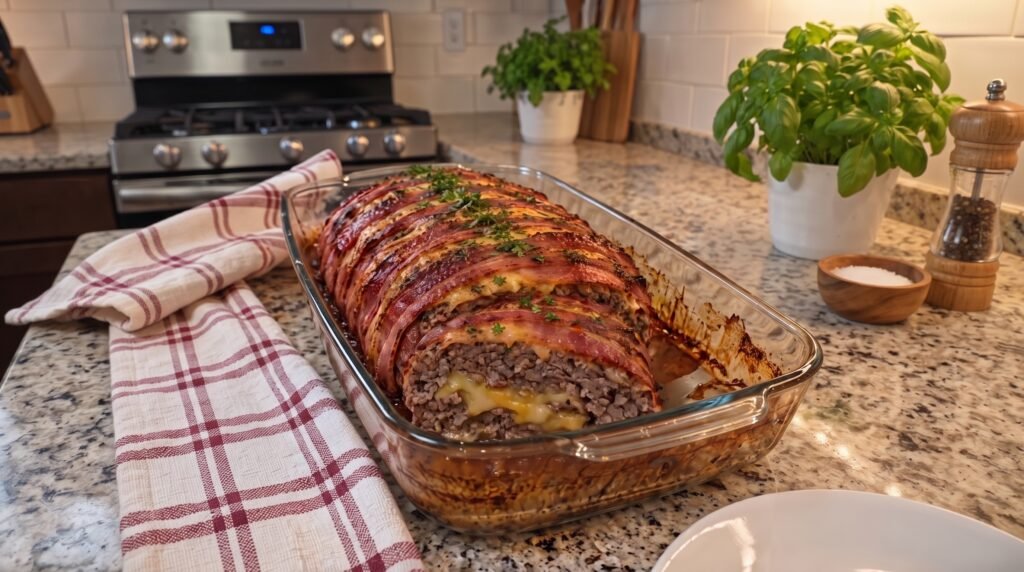
The photo above is the hard-won standard on my kitchen counter: a giant glass casserole dish holding a golden-brown, bacon-wrapped meatloaf, with the front end sliced open to reveal a luscious, molten core of gooey cheddar and Monterey Jack surrounded by juicy, perfectly cooked beef.
Here is how you make this incredible Bacon-Wrapped Cheese-Stuffed Meatloaf at home without losing a drop of cheese or ending up with rubbery bacon.
Why Cheese-Stuffed Meatloaf Goes Wrong (The Science of Steam & Shrinkage)
Ground meat behavior is all about protein networks and thermal expansion. When you hide cheese inside and wrap it in bacon, standard culinary traps will ruin your loaf:
1. The High-Pressure Cheese Blowout
Hard cheeses like cheddar and jack melt into liquid between 130°F and 150°F. Ground beef, however, cooks to safety at 160°F. As the beef cooks, its muscle proteins tighten, squeezing inward like a tightening fist. If your meat seam has air pockets or thin spots, that pressure forces the boiling cheese straight through the weakest point, spilling it into the pan. Creating a solid, continuous log of cheese and sealing the meat seam with damp fingers prevents blowouts.
2. The Flabby Bacon Trap
Thick-cut bacon is great for breakfast, but it is fatal to a wrapped meatloaf. Thick bacon takes 40 minutes of direct dry heat to render its fat. In an oven, the steam evaporating from the raw ground beef beneath the bacon keeps the strips moist, preventing them from crisping. Using standard regular-cut bacon shingled tightly across the top ensures the fat renders completely, bonding to the beef while crisping into a crackling, mahogany crust.
3. The Dense Meat Texture (Skipping the Panade)
If you pack raw ground beef tightly without a binder, the heat forces out all internal moisture, leaving you with a dry, rubbery meat log. Soaking plain panko breadcrumbs in milk until it forms a soft paste (a classic panade) creates a physical starch cushion. The starches trap expanding meat drippings and fats, keeping every slice tender, succulent, and juicy enough to cut with the side of a fork.
Ingredients & Tools You’ll Need
Essential Kitchen Gear
- 9×13-Inch Heavy Tempered Glass Baking Dish: (A clear glass casserole dish, like the one in the photo, catches all the savory bacon drippings and allows you to monitor the loaf base).
- Large Sheet of Parchment Paper: Essential for rolling and shaping the meatloaf into a tight cylinder without sticking to your hands or board.
- Digital Instant-Read Meat Thermometer: (A ThermoWorks ThermoPop or similar digital probe ensures you pull the meatloaf at 155°F to 160°F before it dries out).
- Long, Razor-Sharp Slicing Knife: For cutting clean, uniform slices through the crispy bacon and tender beef without squishing the cheese core.
- Wide Metal Spatula: For supporting the sliced portions when transferring to dinner plates.
The Ingredient Breakdown
| Component | Ingredient | Quantity | Practical Role |
| The Meat Base | 80/20 Ground Chuck (or 50/50 Beef & Pork) | 2.5 lbs (approx. 1.1 kg) | Perfect fat-to-lean balance; stays rich and juicy during baking. |
| The Panade | Plain Panko Breadcrumbs | 1 cup | Light starch crumbs that cushion the beef proteins against shrinking. |
| The Panade | Whole Milk | ½ cup | Hydrates the breadcrumbs into a tender, moisture-retaining paste. |
| The Binders | Large Eggs | 2 whole (lightly beaten) | Structural binder that holds the meat cylinder firmly around the cheese. |
| Aromatic Base | Sweet Yellow Onion | 1 medium (very finely grated or minced) | Grating releases sweet onion juice that seasons throughout the meat. |
| Aromatic Punch | Fresh Garlic Cloves | 4 to 5 cloves (minced) | Delivers robust, savory depth to the beef mixture. |
| Savory Boosters | Worcestershire Sauce | 2 tbsp | Fermented umami engine that gives meatloaf its classic steakhouse profile. |
| Savory Boosters | Tomato Paste & Dijon Mustard | 2 tbsp paste, 1 tbsp Dijon | Adds rich color, tang, and depth to the meat mixture. |
| Herbal Lift | Italian Seasoning & Smoked Paprika | 1 tbsp Italian blend, 1 tsp paprika | Earthy, woodsy spices that season the beef from within. |
| Base Seasoning | Coarse Kosher Salt & Black Pepper | 1.5 tsp salt, 1 tsp coarse black pepper | Crucial seasoning across the beef mixture and bacon exterior. |
| The Molten Core | Block Sharp Cheddar or Monterey Jack | 8 oz (cut into a solid 1×1-inch log) | Melts into that gooey, stretchy golden center seen in the photo. |
| The Crispy Jacket | Regular-Cut Smoked Bacon | 12 to 14 strips (approx. 1 lb) | Shingled across the top to render into a crispy, smoky crust. |
| Fresh Finish | Fresh Flat-Leaf Parsley or Thyme | 2 tbsp (finely chopped) | Sprinkled across the hot bacon crust for color and herbal lift. |
Step-by-Step Cooking Instructions
Step 1: Build the Panade and Seasoning Slurry
Preheat your oven to 375°F (190°C).
Lightly mist your 9×13-inch glass baking dish with nonstick cooking spray or olive oil.
In a large mixing bowl, combine the 1 cup of plain panko breadcrumbs with the ½ cup of whole milk.
Stir with a fork and let it sit on the counter for 5 minutes until the panko absorbs the liquid completely into a soft, uniform paste.
Add the 2 lightly beaten eggs, finely grated sweet yellow onion, minced fresh garlic, 2 tablespoons of Worcestershire sauce, 2 tablespoons of tomato paste, 1 tablespoon of Dijon mustard, Italian seasoning, smoked paprika, coarse kosher salt, and black pepper directly into the bowl with the soaked panko.
Whisk vigorously with a fork for 60 seconds until you have a thick, fragrant, emulsified seasoning slurry.
Step 2: Gently Combine the Beef Matrix
Add your 2.5 pounds of ground chuck into the bowl with the seasoning slurry.
Spread your fingers wide like rakes.
Gently fold and toss the beef with the slurry just until the seasonings and breadcrumb paste are evenly distributed—about 45 to 60 seconds.
The Non-Negotiable Rule: Do not squeeze, knead, or mash the ground beef with tight fists! Overworking ground beef develops heavy myosin protein strands, turning your tender meatloaf into a dense, rubbery block. Keep your touch light and airy.
Step 3: Roll, Stuff, and Seal the Loaf
Lay a large sheet of parchment paper flat on your clean kitchen counter.
Turn the seasoned ground beef mixture out onto the parchment paper.
Using your hands, press and pat the beef into a flat, uniform rectangle roughly 10 inches wide by 12 inches long and about ¾-inch thick.
Take your 8-ounce block of sharp cheddar or Monterey Jack cheese.
Slice it lengthwise into thick, sturdy sticks, arranging them end-to-end to form a continuous 1-inch thick cheese log running horizontally across the lower third of the beef rectangle, leaving a 1.5-inch border on both side ends.
Now, use the parchment paper to lift and roll the meat:
- Lift the bottom edge of the parchment paper, rolling the beef tightly up and over the cheese log.
- Continue rolling forward until you have a smooth, compact cylinder of meat encasing the cheese.
- Tuck the side ends of the meatloaf inward and pinch the seams tightly with damp fingers to completely envelop the cheese inside a thick wall of beef.
- Smooth out any cracks along the top and sides. A seamless exterior is your insurance policy against a cheese blowout!
Carefully lift the rolled meatloaf and place it seam-side down into the center of your prepared 9×13-inch glass baking dish.
Step 4: Shingle the Bacon Jacket
Take your strips of regular-cut bacon.
Begin laying the bacon strips crosswise over the top of the meatloaf, overlapping each strip by about a quarter-inch like shingles on a roof (exactly as pictured in the reference photo).
Tuck the excess ends of the bacon strips snugly underneath the sides of the meatloaf so they don’t curl up as they bake.
Work all the way from one end of the loaf to the other until the entire top and sides are enveloped in a tight jacket of overlapping bacon.
Step 5: The Two-Stage Bake
Slide the glass baking dish onto the center rack of your preheated 375°F (190°C) oven.
Bake uncovered for 50 to 55 minutes.
During this time, the interior beef cooks gently, the cheese melts into a molten core, and the bacon renders its fat down into the glass dish, creating a pool of savory drippings.
At the 50-minute mark, slide the probe of your digital instant-read thermometer into the meatloaf (aim for the meat layer just above the cheese core):
- Target Reading: 155°F (68°C).
Step 6: The Golden Broiler Crisp
Once your thermometer reads 155°F, leave the dish in the oven and switch the setting to BROIL (High).
Keep your eyes glued to the oven window for 2 to 3 minutes.
The direct radiant heat from the broiler will cause the bacon fat to bubble aggressively, toasting the pork shingles into that deep mahogany, blistered, crackling crust visible in the photo.
The moment the bacon is deeply caramelized and crisp along the ridges, pull the baking dish out immediately using heavy heatproof mitts.
Step 7: The Mandatory 12-Minute Rest
Set the hot glass baking dish onto a wooden board or heatproof trivet on your kitchen counter.
Scatter finely chopped fresh Italian flat-leaf parsley and fresh thyme across the sizzling bacon crust for a vibrant pop of color.
Cook’s Real-Life Tip: Do not cut into this meatloaf right now!
Straight out from under the broiler, the cheese core is boiling liquid lava, and the beef fibers are contracted under intense heat.
If you slice into the loaf immediately, the molten cheese will gush straight out into the pan, leaving an empty cave inside your meat.
Let the meatloaf rest undisturbed in the pan for 10 to 12 full minutes.
During this rest:
- Carryover heat finishes cooking the beef safely to 160°F.
- The molten cheddar stabilizes from runny liquid into a thick, gooey, stretchy cream that holds its shape when sliced.
- The beef fibers relax and reabsorb their internal juices, guaranteeing an exceptionally tender slice.
Using a long, razor-sharp carving knife, cut the meatloaf into thick, hearty slices—roughly ¾-inch to 1-inch thick.
Use a wide metal spatula to lift each slice cleanly onto dinner plates, spooning a drizzle of the savory bacon-beef drippings from the bottom of the glass dish right over the top.
Practical Troubleshooting & Common Mistakes
- “My cheese blew out the side and pooled in the pan.”
This happens if your beef layer was too thin on one side, or if you didn’t pinch the seams tightly shut. Always make sure the cheese log is centered with an even layer of meat around all sides, and smooth out any surface cracks with damp fingers before shingling the bacon. - “The bacon on top was soft and rubbery.”
You likely used thick-cut bacon or skipped the broiler finish. Stick strictly to regular thin-cut bacon, which renders and crisps much faster, and always give the loaf that final 2- to 3-minute blast under the broiler to blister the pork skin. - “The meatloaf turned out dry and crumbly.”
This is the hallmark of using ultra-lean beef (like 90/10) or skipping the panko-and-milk panade. Meatloaf requires 80/20 ground chuck and a hydrated panade to cushion the proteins and retain moisture during a 50-minute bake.
Delicious Upgrades & Variations
While this classic cheddar and bacon combination is pure comfort food, you can easily adapt the flavor profile to match your cravings:
- The Jalapeño Popper Meatloaf: Stuff the center with a blend of cream cheese, sharp cheddar, and minced pickled jalapeños. Season the beef with a dash of cumin and chili powder.
- The Barbecue Glazed Bacon Loaf: Brush the shingled bacon with ¼ cup of your favorite sweet, smoky barbecue sauce during the final five minutes of baking, then broil until caramelized and sticky.
- The Italian Mozzarella & Provolone Twist: Stuff the loaf with whole-milk mozzarella and provolone cheese sticks. Season the beef with Italian herbs and garlic, and serve with warm marinara sauce on the side.
What to Serve with Bacon-Wrapped Meatloaf
This dish is rich, savory, and produces plenty of flavorful pan juices, making it the perfect partner for comforting, absorbent sides:
- Garlic Butter Mashed Potatoes: The gold standard. Fluffy Yukon Gold mashed potatoes catch every drop of the savory bacon drippings and complement the molten cheese core.
- Roasted Green Beans or Asparagus: Tossed in olive oil, sea salt, and a squeeze of fresh lemon juice, snappy green vegetables provide a clean, refreshing crunch that balances the rich meat and bacon.
- Crisp Chopped Garden Salad: Romaine lettuce, sliced cucumbers, and cherry tomatoes tossed in a bright red-wine vinaigrette cleanse the palate between rich bites.
- Crusty Dinner Rolls or Sourdough: Mandatory for wiping the plate clean of every drop of savory pan jus.
Storing and Reheating Leftovers
If you have leftover slices of meatloaf, let the dish cool to room temperature, transfer them to an airtight glass container, and store in the refrigerator for up to 4 days.
Leftover slices make hands-down the greatest hot meatloaf sandwiches on toasted sourdough with extra melted cheese and spicy mustard you will ever experience.
Avoid blasting cold slices in the microwave on high power! The intense radiation will overcook the tender beef and cause the cheese center to separate into clear oil.
Instead, use your toaster oven or a covered skillet:
- Place a leftover meatloaf slice in a small skillet over medium-low heat.
- Splash in 1 to 2 tablespoons of beef broth or water and cover with a lid.
- Warm gently for 5 to 6 minutes until the beef is hot and the cheese core melts back into gooey perfection.
The bacon stays savory, the meat remains succulent, and you get to enjoy an elite comfort food feast all over again with practically zero effort!