
Introduction: When a Lazy Weeknight Dinner Goes Up in Smoke
Let me take you back to a chaotic Thursday evening a few months ago. I was completely exhausted from a brutal week of work, staring into my refrigerator with zero inspiration, trying to figure out how to feed my family without spending a fortune on takeout. I spotted a pack of boneless, skin-on chicken thighs sitting in the crisper drawer.
“I’ll just make a quick sweet chili glaze,” I told myself with supreme overconfidence. “How hard can it be? Just dump the sauce in a pan and cook it down.”
Oh, the absolute foolishness of that thought.
I threw the chicken thighs into a cold skillet, poured a thick mixture of sweet chili sauce, soy sauce, and minced garlic right over the raw meat, and cranked the burner up to high because I was in a rush.
Ten minutes later, my kitchen was filled with thick, acrid black smoke that set off the smoke detector and sent our cat scrambling under the couch. The sugar in the sweet chili sauce had instantly scorched into a black, bubbling asphalt layer that welded itself permanently to the bottom of my favorite skillet. The chicken skin was pale, rubbery, and soggy, while the meat inside was still pink and raw.
I stood there coughing, waving a kitchen towel at the smoke detector, staring at a completely ruined dinner. We ended up eating scrambled eggs and toast while I soaked my poor skillet in hot soapy water for three hours.
That kitchen catastrophe bruised my ego, but it also made me obsessed. I refused to let chicken thighs defeat me. I spent the next few weeks testing, tweaking, and completely redesigning how to get that shatteringly crisp skin and sticky, glossy glaze without turning my kitchen into a disaster zone.
Today, I am sharing the glorious result of that journey: my absolute favorite Crispy Sweet Chili Glazed Chicken Thighs. It is sweet, savory, incredibly juicy inside, and once you know the secret steps, it is completely foolproof. Grab a heavy skillet and let’s dive in.
The Reality Check: Why Cooking Sticky Chicken at Home Can Be a Minefield
Before we get to the fun part of cooking, we need to talk about why making sticky, sweet-glazed chicken at home can feel like walking through a minefield.
Have you ever tried making a sweet or sugary glaze in a pan, only to watch it burn into a bitter, black mess before the meat is even cooked through? Or have you ever tried cooking chicken thighs with the skin on, only to end up with a rubbery, flabby texture instead of that gorgeous golden crunch?
I made every single one of those mistakes so you don’t have to repeat them. Here are the three golden rules I learned the hard way:
- Never add sugary sauce to a hot pan too early. Sweet chili sauce, honey, and brown sugar contain high amounts of natural and added sugars that caramelize quickly and burn almost instantly at high temperatures. If you dump a sweet glaze into the pan at the beginning, you will end up with charcoal. The glaze always goes in at the very end of the cooking process.
- Render the fat out slowly. Chicken thighs are wonderfully forgiving and juicy because of their fat content, but skin-on thighs need time. If you rush the cooking process on high heat, the skin burns before the fat renders out. You have to start skin-side down in a medium-hot pan and let the fat slowly melt away to build that crispy crunch.
- Choose the right cut. While boneless, skinless breasts are popular, they dry out in a heartbeat. Boneless, skin-on chicken thighs provide the ultimate juicy texture and act as the perfect canvas for a rich pan sauce.
With those hard-earned lessons tucked under our aprons, let’s look at what you need to stock your kitchen counter with.
The Ingredient List
For a meal that tastes like an expensive restaurant dish, the ingredient list is surprisingly straightforward. You can find everything easily at your local grocery store.
| Category | Item | Quantity / Notes |
| The Chicken | Boneless, Skin-On Chicken Thighs | 2 lbs (skin-on is essential for that crispy texture and rich presentation). Pat them completely dry! |
| The Seasoning | Kosher Salt & Black Pepper | 1 tsp salt + 1/2 tsp black pepper for seasoning the meat. |
| Smoked Paprika & Garlic Powder | 1 tsp smoked paprika + 1 tsp garlic powder for an earthy background kick. | |
| The Sweet Chili Glaze | Sweet Chili Sauce | 1/2 cup. Provides that classic sticky, glossy sweetness with a mild kick. |
| Soy Sauce | 3 tablespoons. Adds depth and savory umami to balance the sweetness. | |
| Rice Vinegar | 1 tablespoon. Provides a tiny splash of acid to cut through the richness. | |
| Fresh Garlic & Ginger | 5 cloves garlic (minced) + 1 tbsp fresh ginger (minced). Fresh is non-negotiable! | |
| Searing Fat & Garnish | Olive Oil or Avocado Oil | 1 tablespoon. Helps crisp the skin. |
| Red Pepper Flakes or Chili Powder | 1/2 teaspoon (optional, for an extra touch of heat). |
Step-by-Step Guidance: Building Your Masterpiece
Ready to get to work? Make sure you have a large, heavy skillet or cast-iron pan ready. A heavy skillet distributes heat evenly and helps develop that amazing crispy texture on the chicken skin—trust me, after my smoky Thursday night disaster, a good heavy pan is my non-negotiable rule.
Step 1: Prep and Dry the Chicken
- Bring to Room Temp: Take your chicken thighs out of the fridge about 15 minutes before cooking. Cold meat hitting a hot pan causes the temperature to drop and makes the chicken cook unevenly.
- Pat Dry: Grab a roll of paper towels and pat every single chicken thigh until it is completely bone dry. Moisture is the enemy of a crisp crust; if the skin is wet, it will steam instead of sear.
- Season Generously: Season both sides of the chicken thighs with your kosher salt, black pepper, garlic powder, and smoked paprika. Rub the spices gently into the skin.
Step 2: Render and Crisp Skin-Side Down
- Place your heavy skillet over medium heat and add your tablespoon of olive oil.
- Once the oil is shimmering, place the chicken thighs skin-side down in a single layer in the pan.
- Hands Off: Let them cook undisturbed over medium heat for about 10 to 12 minutes. You will hear them sizzle happily as the fat renders out of the skin. Watch as the skin turns golden-brown and wonderfully crispy. If the heat is too high and they are smoking, turn it down slightly.
Step 3: Flip and Cook Through
- Carefully flip the chicken thighs over to the meat side.
- Cook for another 6 to 8 minutes until the chicken is cooked through and reaches an internal temperature of 165°F (74°C) in the thickest part.
- Optional Pro-Tip: If there is a massive pool of rendered chicken fat in the pan, carefully spoon out most of it, leaving just a thin layer behind so your glaze doesn’t become overly greasy.
Step 4: Whisk and Pour the Glaze
- In a small mixing bowl, whisk together your sweet chili sauce, soy sauce, rice vinegar, minced garlic, minced ginger, and red pepper flakes until combined.
- Turn your stove burner down to medium-low heat.
- Pour the sweet chili glaze directly into the skillet all around the chicken thighs. As the sauce hits the warm pan, it will instantly begin to bubble and foam up.
- Spoon the bubbling glaze continuously over the top of the chicken thighs for 2 to 3 minutes as it thickens into a rich, sticky lacquer that coats the crispy skin. Turn off the heat.
Real Examples, Use Cases, and Life Lessons
Even seasoned home cooks run into roadblocks. Here are a few practical scenarios and common traps to keep in mind so your dinner goes off without a hitch:
- The Scorched Sugar Trap: The biggest mistake people make with sticky glaze recipes is turning the heat up too high when the sweet chili sauce goes into the pan. Sugary sauces burn in seconds if blasted with high heat. Always drop your burner temperature down to medium-low before pouring the sauce in.
- Skipping the Pat-Down: If you skip drying your chicken thighs with paper towels, the water trapped on the skin will react with the hot oil, causing popping splatters and resulting in a soggy, pale skin texture. Take thirty seconds to dry them properly!
- Leftovers and Reheating: These glazed chicken thighs make incredible leftovers for lunch the next day. When reheating, place them in a small skillet over low heat with a tiny splash of water, cover with a lid, and warm gently for 4 minutes. Avoid microwaving them on high power, or the crispy skin will turn rubbery.
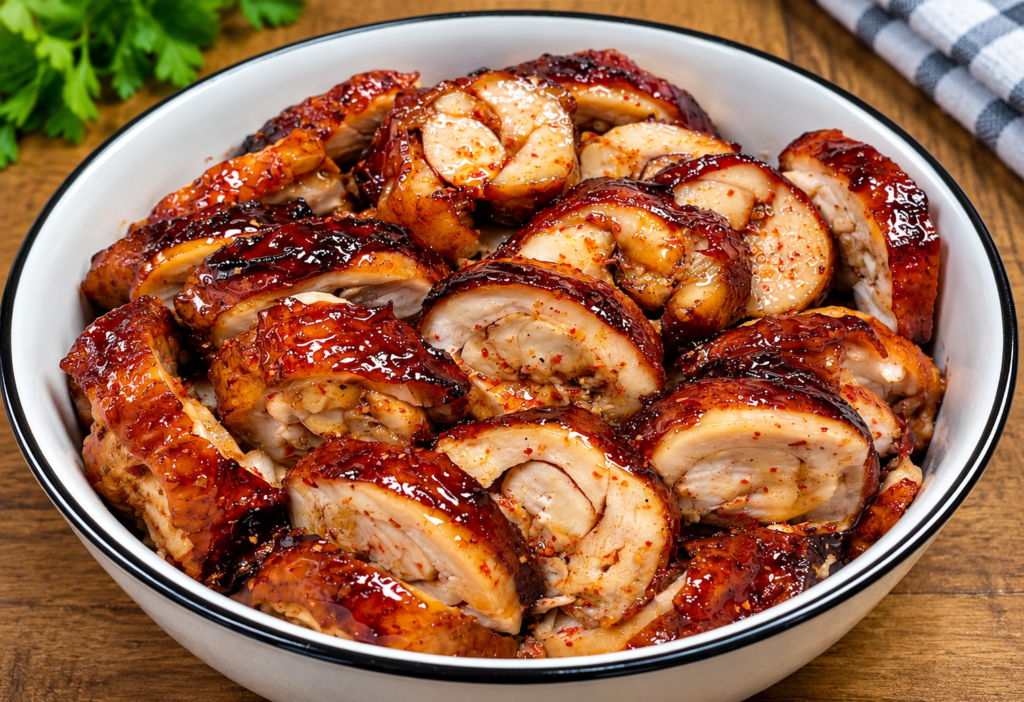
As for serving suggestions? Slice the glazed chicken thighs into neat round medallions (just like the delicious presentation in our reference image) and serve them over a bed of steaming jasmine rice, garlic butter noodles, or roasted broccoli. Spoon any remaining sticky pan sauce generously over the top. It is an absolute crowd-pleaser.
Common Mistakes to Avoid Summary
To ensure your Crispy Sweet Chili Chicken Thighs turn out tender, juicy, and perfectly glazed on your very first try, keep these quick checkpoints handy:
- Don’t add the glaze too early: Wait until the chicken is fully cooked through before pouring in the sweet chili sauce to prevent burning.
- Don’t crowd the pan: Cook your chicken thighs in batches if your skillet isn’t large enough so they sear properly instead of steaming.
- Don’t skip drying the skin: Always pat your chicken dry with paper towels to achieve that shatteringly crisp skin texture.
Final Thoughts
That smoky Thursday night disaster feels like a lifetime ago now. Making an incredible, restaurant-quality sticky chicken dish at home isn’t about being a professional chef; it’s about respecting your ingredients, managing your heat levels, and learning how sugars behave in a hot pan.
Next time you need a quick, impressive weeknight dinner that will wow your family, skip the takeout menu and spend 25 minutes making these Crispy Sweet Chili Chicken Thighs.
Take your time, keep the heat controlled when the sweet chili sauce goes in, and enjoy every single sweet, savory, and crispy bite. Happy cooking!