
I will never forget the Super Bowl Sunday gathering three years back that nearly made me swear off making taco night apps forever.
I had been daydreaming about serving something cute, individual, and crunchy for our friends: adorable mini edible taco salad cups, packed with savory, seasoned ground beef, warm refried beans, melted cheddar cheese, cool shredded lettuce, diced tomatoes, and a dollop of sour cream on top. I thought I could just press standard flour tortillas into a standard 12-cup muffin tin, dump cold raw beef and watery salsa right into the raw dough, and let the oven do all the heavy lifting.
Thirty minutes later, my game-day snack turned into an absolute soggy disaster.
The steam from the wet beef and salsa had completely trapped itself inside the tight muffin cups. Instead of a golden, shatteringly crisp edible bowl, the tortillas had turned into rubbery, pale, waterlogged dough paste on the bottom that stuck to the metal pan like industrial wallpaper glue.
Worse, when my friend picked one up by its rim, the soggy bottom gave way entirely, splashing hot seasoned beef grease straight onto their clean jersey. Everyone ended up eating the fillings out of the torn dough bowls with disposable forks, and I spent half the halftime show scrubbing blackened, burnt flour rims off my nonstick muffin tin.
That humiliating evening sent me straight into my kitchen workshop to study starch dynamics and pastry physics.
Edible tortilla bowls are meant to deliver that craveable, shatteringly crisp crunch you get at classic Tex-Mex cantinas. But you cannot treat them like a soft burrito, and you cannot expect unbaked, wet flour dough to crisp up when it is suffocating under heavy wet fillings inside a deep metal well.
The secret comes down to three simple, repeatable kitchen moves: brushing small tortillas with oil and par-baking them in an inverted or standard muffin tin until rigid and blistered before filling, building a moisture-blocking bean-and-cheese seal along the base, and draining all excess grease from the beef so your shells stay crispy down to the very last bite.
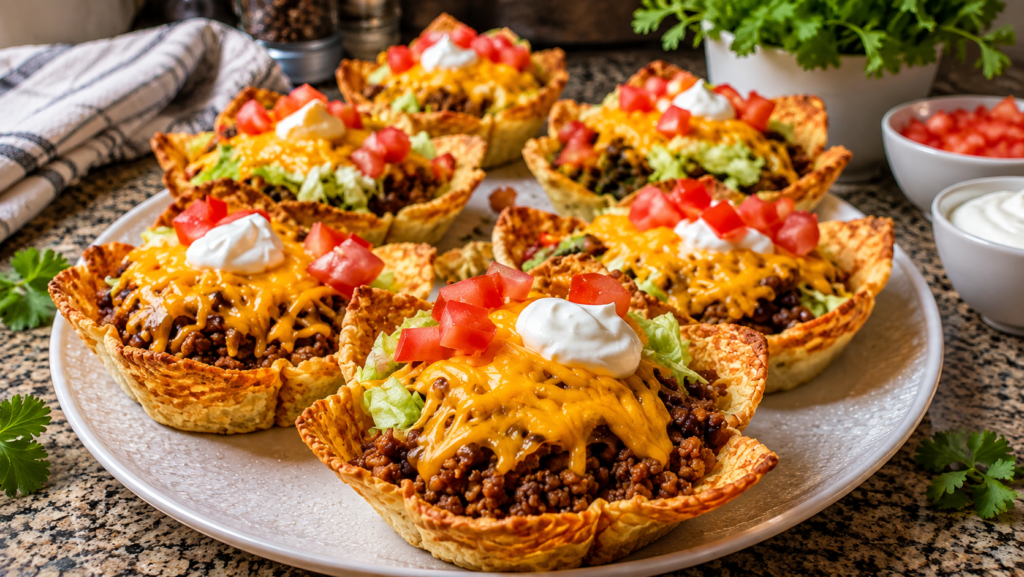
The photo above is the hard-earned victory sitting on my dining platter: gorgeous, flower-shaped crispy golden baked tortilla bowls, filled to the brim with rich seasoned ground beef, smothered under a blanket of glossy melted cheddar, and crowned with crisp shredded iceberg, fresh diced Roma tomatoes, and a cool dollop of sour cream.
Here is how you recreate these foolproof, restaurant-quality Mini Baked Taco Salad Bowls at home without ever facing a soggy bottom or torn shell again.
Why Homemade Tortilla Bowls Turn Soggy and Limp (The Science)
Flour and corn tortillas are rich in starches that readily absorb moisture from surrounding air and liquids. When you bake them into bowl shapes inside an oven, standard kitchen mistakes can ruin your crunch:
1. The Steam-Lock Muffin Pan Trap
When you push a flat tortilla down into a metal muffin cup, you create multiple overlapping folds of dough. If you fill that dough raw with wet ground beef, canned beans, and salsa, the water has nowhere to escape. The metal cup traps the moisture against the exterior of the tortilla, boiling the starches instead of frying them. Par-baking the empty, oiled shells for 8 to 10 minutes dehydrates the dough, triggering the Maillard reaction and locking the starches into a rigid, crispy bowl that completely repels liquid.
2. The Free Grease Problem
Ground beef (especially 80/20 or standard taco meat) renders a massive amount of liquid fat and water. If you spoon warm beef directly out of the skillet into your cups without straining it thoroughly, that hot tallow pools in the base of the crispy shell, softening the fried crust within minutes. Straining your cooked meat in a fine-mesh colander and simmering it with a thickened tomato-paste taco sauce ensures the beef stays juicy without dripping free grease.
3. The Cold Produce Condensation Dilemma
Piling cold, wet diced tomatoes and watery shredded lettuce directly onto boiling-hot meat creates instant thermal condensation. The steam rising off the beef hits the cold produce, condenses into water droplets, and runs down to the bottom of the shell. A strategic layer of melted cheese acts as an edible waterproof seal, keeping the meat heat insulated while preserving the cool crunch of your toppings.
Ingredients & Tools You’ll Need
Essential Kitchen Gear
- Standard 12-Cup Metal Muffin Tin: (Used either standard or flipped upside down to drape the tortillas between the cups, creating that gorgeous scalloped flower petal edge seen in the photo).
- 3.5- to 4-Inch Round Biscuit Cutter or Glass: For trimming large tortillas down into perfect mini circles (or you can buy mini “street taco” sized tortillas directly).
- Pastry Brush & Small Oil Bowl: For brushing the tortillas with a thin, even coat of oil on both sides.
- 12-Inch Cast-Iron or Heavy Nonstick Skillet: For browning the ground beef crumbles and blooming the taco spices.
- Meat Chopper or Wooden Spoon: For mincing the meat into tiny, uniform crumbles that spoon cleanly into small cups.
The Ingredient Breakdown
| Component | Ingredient | Quantity | Practical Role |
| The Crispy Vessels | 6-Inch Flour or Corn-Flour Blend Tortillas | 12 tortillas (street-taco size) | Bakes into rigid, blistered, shatteringly crisp edible cups. |
| The Crisping Fat | High-Smoke-Point Oil (Avocado or Canola) | 3 tbsp (for brushing) | Creates that deep golden blister and prevents sticking. |
| The Savory Meat | 85/15 Ground Chuck or Lean Beef | 1 lb (450g) | Rich, juicy protein base; enough fat for flavor without turning greasy. |
| Aromatic Base | Sweet Yellow Onion | ½ medium (finely diced) | Sweated in the beef fat to provide natural sweetness and texture. |
| Aromatic Punch | Fresh Garlic Cloves | 3 cloves (minced) | Delivers pungent, savory depth to the taco meat. |
| Taco Seasoning | Chili Powder, Cumin, Garlic & Onion Powder | 2 tbsp total (or 1 packet low-sodium) | Classic warm Tex-Mex spice blend that coats the beef crumbles. |
| The Thick Sauce | Tomato Paste & Water (or Broth) | 1.5 tbsp paste + ⅓ cup water | Forms a thick, glossy taco glaze that clings to the beef without dripping. |
| The Moisture Barrier | Traditional Refried Beans (warmed) | ½ cup (optional, 1 tsp per cup) | Spread along the base to anchor the beef and seal the crust. |
| The Molten Crown | Sharp Cheddar & Monterey Jack | 2 cups (freshly shredded, divided) | Melts into that glossy, gooey blanket visible across the top. |
| Crisp Cold Finish | Iceberg Lettuce | 1.5 cups (shredded paper-thin) | Cool, refreshing, watery crunch that balances the warm savory beef. |
| Fresh Topping | Fresh Roma Tomatoes | 2 medium (seeded and finely diced) | Bright red, acidic bites scattered over the melted cheese. |
| Cool Garnish | Full-Fat Sour Cream (or Crema) | ½ cup (for dolloping) | Rich, cool creaminess that cuts through the spiced beef. |
| Base Seasoning | Coarse Kosher Salt & Black Pepper | 1 tsp salt, ½ tsp black pepper | Crucial seasoning across the beef and fresh tomato garnishes. |
Step-by-Step Cooking Instructions
Step 1: Prep and Soften the Tortillas
Preheat your oven to 375°F (190°C).
If you are using standard 6-inch tortillas, they are usually a little stiff straight out of the plastic bag.
Wrap the stack of 12 tortillas in a damp paper towel and microwave them for 20 to 25 seconds until they are warm, soft, and completely pliable.
Why This Matters: Trying to fold cold tortillas into muffin cups will cause the delicate dough to snap and tear along the creases, letting fillings leak out during baking. Warm tortillas mold like soft fabric.
Step 2: Brush, Shape, and Par-Bake the Shells (The Anti-Soggy Secret)
Pour 3 tablespoons of avocado or canola oil into a small dish.
Using a pastry brush, lightly brush both sides of each warm tortilla with a thin, even sheen of oil.
Now, shape your bowls using your 12-cup metal muffin tin:
- Method A (Standard Cup Shaping): Gently press each oiled tortilla into a muffin cup, pleating and ruffling the outer edges so the dough forms a ruffled flower-like bowl with flaring edges (exactly like the beautiful cups in the reference photo).
- Method B (The Upside-Down Drape): Flip your muffin tin upside down on your counter. Drape each oiled tortilla over the space between four raised cup bottoms. This creates a natural ruffled bowl shape that browns ultra-fast with zero trapped moisture.
Slide the muffin tin into your preheated 375°F (190°C) oven.
Bake empty for 8 to 10 minutes.
Watch through the oven window: the tortillas will puff up slightly, bubble with tiny blisters, and turn a crisp, rigid, light golden-brown.
Remove the tin from the oven and let the empty crispy shells cool in the pan for 3 minutes. They will firm up into rock-solid, crunchy edible bowls.
Step 3: Cook and Season the Taco Beef
While the shells par-bake, place your 12-inch skillet over medium-high heat on the stovetop.
Add your 1 pound of ground chuck and finely diced yellow onion.
Use your meat chopper to break the beef apart into fine, uniform morsels as it sizzles.
Cook for 5 to 6 minutes until the meat is deeply browned and no pink remains.
Stir in the minced garlic and cook for 60 seconds just until fragrant.
Tilt the skillet carefully and spoon off all the rendered grease, or pour the beef into a heatproof colander to drain completely.
Return the drained meat to the skillet over medium-low heat.
Sprinkle the 2 tablespoons of taco seasoning, 1 teaspoon of kosher salt, and ½ teaspoon of black pepper over the beef.
Add the 1.5 tablespoons of tomato paste and ⅓ cup of water (or beef broth).
Stir well and let it simmer for 2 to 3 minutes until the tomato paste dissolves into a rich, thick glaze that clings tightly to every meat crumble with zero watery puddle in the skillet. Remove from heat.
Step 4: The Strategic Layered Assembly
Leave your par-baked crispy tortilla bowls right inside the muffin tin (or transfer them to a parchment-lined baking sheet).
- The Bean Seal (Optional but Fantastic): Spread a tiny teaspoon of warm refried beans flat across the bottom of each crispy shell. This acts as a savory, edible glue that protects the bottom crust from moisture.
- The Savory Meat Fill: Spoon roughly 2 generous tablespoons of hot, seasoned ground beef into each cup, pressing down gently with your spoon to compact the filling without cracking the delicate shell walls.
- The Cheese Mantle: Mound roughly 1.5 to 2 tablespoons of freshly shredded cheddar and Monterey Jack cheese generously over the top of the beef in each bowl. Let the cheese drape slightly over the flaring ruffled tortilla edges.
Step 5: The Quick Melt Bake
Return the filled muffin tin to the 375°F (190°C) oven for 4 to 5 minutes.
You do not need to bake them long—the shells are already crisp and the meat is already hot!
You simply want the cheddar to melt into a glossy, bubbling, golden-orange blanket that coats the meat crumbles (just as seen in the photo).
Pull the pan out of the oven the moment the cheese is molten and bubbling.
Step 6: The Cool Rest and Fresh Garnish
Let the cheesy taco cups rest in the pan on your counter for 3 full minutes.
Important Cook’s Rule: Do not put cold sour cream or cold lettuce on piping-hot, bubbling cheese immediately!
If you do, the extreme thermal shock will melt your sour cream into a runny liquid and wilt your crisp lettuce into limp greens within sixty seconds.
Once the cheese has cooled from blazing hot to a warm, soft blanket:
- Scatter a delicate pinch of finely shredded iceberg lettuce over the melted cheese in each cup.
- Scatter brightly colored, finely diced fresh Roma tomatoes across the top.
- Place a generous dollop (about 1 rounded teaspoon) of cold, thick sour cream right in the center of each mini bowl (exactly like the picture-perfect arrangement in the photo).
Use a pair of tongs or clean fingers to lift the crispy, loaded taco salad bowls out of the muffin tin and arrange them across a wide serving platter. Serve immediately while the shells are shatteringly crisp and the beef is warm!
Practical Troubleshooting & Common Mistakes
- “The bottom of my tortilla bowls turned soft.”
This happens if you skip par-baking the empty shells before adding the fillings. Tortillas need direct contact with hot oven air to crisp up before being filled with wet ingredients. Never skip Step 2! - “The taco cups cracked when I pushed them into the tin.”
Cold tortillas are brittle. Always warm them under a damp paper towel in the microwave for twenty seconds so the dough becomes supple and stretchy before molding them into the muffin wells. - “The sour cream melted into a runny white mess.”
This is the hallmark of garnishing too quickly. Always let the hot cheese rest on the counter for 3 to 4 minutes before adding the cold sour cream and crisp lettuce.
Delicious Upgrades & Variations
While this classic seasoned beef and cheddar combination is the ultimate crowd-pleaser, you can easily customize these cups for any gathering:
- The Shredded Salsa Verde Chicken Cup: Swap the ground beef for shredded rotisserie chicken tossed in tangy salsa verde, diced green chilies, and cumin. Top with Monterey Jack and fresh cilantro.
- The Vegetarian Black Bean & Guacamole Bowl: Fill the crispy shells with seasoned black beans, sweet fire-roasted corn, and sautéed fajita bell peppers. Crown with melted cheese, fresh guacamole, and pico de gallo.
- The Fiery Jalapeño Crunch: Fold finely diced pickled or fresh jalapeños directly into the meat filling, and dust the sour cream dollop with smoked paprika or tajín for a zesty, spicy kick.
What to Serve Alongside Mini Taco Salad Bowls
These mini edible bowls are handheld, tidy, and packed with flavor, making them the ultimate centerpiece for game days, cocktail parties, and casual weeknight dinners:
- Restaurant-Style Tortilla Chips & Salsa: Set out a big basket of warm corn chips with bowls of fresh salsa roja, creamy queso dip, and chunky guacamole.
- Mexican Street Corn Salad (Esquites): Sweet charred corn tossed with cotija cheese, lime juice, cilantro, and chili powder provides a sweet, smoky counterpoint to the savory beef cups.
- Chilled Mexican Lagers or Citrus Margaritas: A frosty Mexican beer with a lime wedge or a tart, fresh-squeezed lime margarita cuts right through the rich melted cheese and seasoned beef.
Storing and Make-Ahead Instructions
These mini taco salad bowls are at their absolute peak within twenty minutes of assembly while the shells are shatteringly crisp. However, you can easily prep the components ahead of time for stress-free entertaining:
How to Prep Ahead:
- Bake the Shells: Par-bake the empty oiled tortilla shells in the muffin tin up to 2 days in advance. Once completely cool, store them in a large, sealed ziplock bag at room temperature. They will stay perfectly crisp and dry.
- Prep the Meat: Cook the seasoned ground beef, drain it, and store it in an airtight container in the refrigerator for up to 3 days.
- Assemble in Minutes: When your guests arrive, place the pre-baked shells on a baking sheet, fill with warmed beef and shredded cheese, bake for 5 minutes at 375°F to melt the cheese, top with cold lettuce, tomatoes, and sour cream, and serve!
If you happen to have fully assembled leftover cups with cold toppings, remove the lettuce and sour cream before reheating. Warm the meat-and-cheese-filled shells in a 350°F (175°C) toaster oven or air fryer for 3 to 4 minutes to re-crisp the tortilla base, then dollop with fresh toppings and enjoy that incredible crunch all over again!