
I will never forget the stormy Tuesday night a couple of years back that made me question my basic kitchen sanity.
It was mid-November, the house felt drafty, and I wanted nothing more than an earthy, rustic one-pot dinner: sweet green cabbage braised until silky and buttery, juicy chicken thighs, and smoky, crisp bacon crumbles tying everything together. It felt like the ultimate budget-friendly peasant meal—the kind of simple comfort food that makes your whole house smell warm and welcoming.
I figured the slow cooker was made for this. I grabbed a head of green cabbage, chopped it up, threw it raw into the bottom of the black oval crock, dumped four raw, pale chicken thighs right on top, tossed in a few strips of uncooked diced bacon, poured in two cups of chicken stock, locked the lid, and set it to low for seven hours.
When I walked through the front door after work, I wasn’t greeted by the smell of roasting savory chicken.
The entire kitchen smelled like an unventilated high school cafeteria serving boiled Brussels sprouts. When I took off the lid, the sight was even worse.
The cabbage had dumped its natural water supply, filling the slow cooker nearly to the brim with a murky, pale yellowish broth. Floating on top was an unappealing slick of greasy, unrendered chicken and bacon fat.
The chicken skin hadn’t browned at all; it was flabby, gelatinous, and rubbery, sliding right off the pale bone. The bacon bits were limp, pale, and slimy, clinging like wet band-aids to the mushy cabbage ribbons.
When my partner scooped a forkful onto a plate, the cabbage collapsed into waterlogged shreds that tasted bitter and boiled. We picked out the interior meat, left the rubbery skin and soggy cabbage behind, and ended up eating toasted cheese sandwiches at 8:30 PM.
That disastrous meal bothered me because braised cabbage and poultry should be an absolute home run. The failure came down to two major culinary traps: completely underestimating the massive water volume trapped inside fresh cabbage, and expecting pork fat and poultry skin to magically crisp up inside a sealed steam chamber.
Once I figured out how to sear the chicken skin hard in a hot skillet first, render the bacon into crackling nuggets, sauté the cabbage ribbons in that smoky bacon grease, and restrict the added cooking liquid to just a tiny splash of seasoned bone broth, everything clicked.
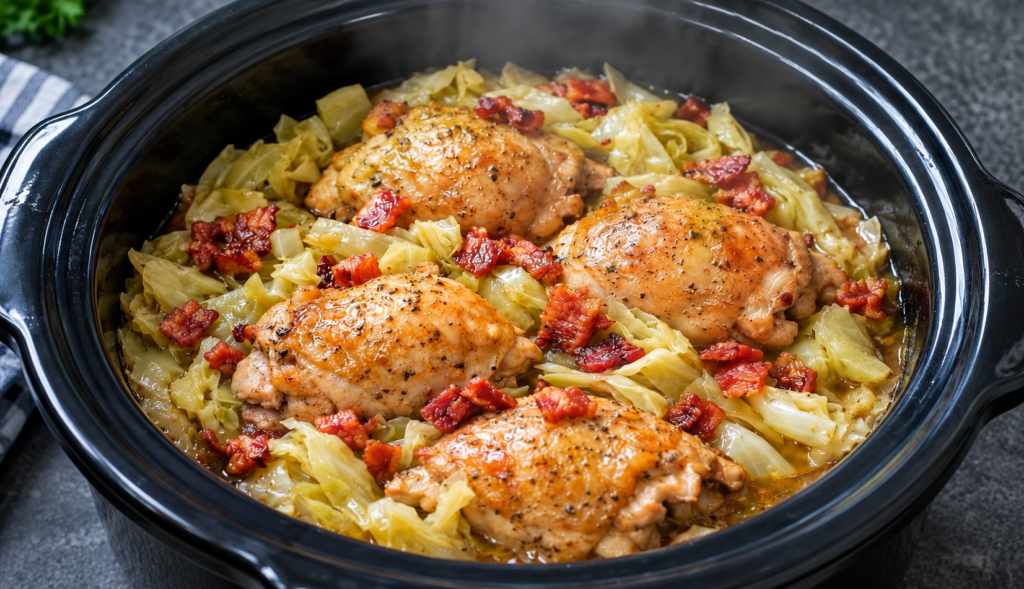
The photo above is the hard-won victory in my kitchen: four plump, deeply seared, golden-brown chicken thighs nestled over a bed of buttery, tender braised cabbage, topped with smoky, crispy bacon crumbles and glistening in rich, savory pan juices inside my black oval slow cooker.
Here is how you nail this deeply comforting, rustic meal at home without a single drop of sulfur funk or soggy skin.
Why Slow-Cooker Cabbage and Chicken Go Wrong (The Moisture & Fat Physics)
Cooking brassicas and skin-on poultry in a closed environment requires understanding moisture release and fat rendering:
1. The 92% Water Trap
A standard head of green cabbage looks firm and dense, but it is over 90% water by weight. In an enclosed slow cooker with the lid locked down, that liquid has nowhere to evaporate. If you add a full cup or two of chicken broth to the pot, the cabbage ends up boiling in its own moisture instead of braising. You only need ¼ to ⅓ cup of liquid to get the slow cooker going; the cabbage will slowly collapse and sweat out its own sweet juices, creating a concentrated, flavorful pan sauce without turning the bottom of the pot into soup.
2. The Sulfur “Boiled Cabbage” Smell
Cabbage contains glucosinolates—sulfur compounds that break down into pungent isothiocyanates when exposed to prolonged moist heat. If raw cabbage sits submerged in hot water under a lid for hours, those sulfur gases stay trapped in the liquid, resulting in that harsh, bitter “cabbage roll” odor. Sweating the cabbage in a hot skillet with a little rendered bacon fat and an acidic splash of apple cider vinegar before slow-cooking evaporates those volatile sulfur gases early, locking in natural sweetness and a buttery finish.
3. Skin and Bacon Need Radiant Contact
Neither chicken skin nor diced bacon can render properly under trapped steam. If placed in the slow cooker raw, they steam, leaving behind limp, rubbery fat. Searing the chicken thighs skin-side down in a smoking skillet for 5 to 6 minutes renders out the heavy subcutaneous fat layer and develops an amber, savory Maillard crust that won’t turn into jelly during the braise. Cooking the bacon separately until crisp allows you to use the bacon fat to flavor the cabbage, while reserving the crispy bits to crown the dish right before serving.
Ingredients & Tools You’ll Need
Essential Kitchen Gear
- 6- to 7-Quart Oval Slow Cooker: (An oval ceramic slow cooker provides the wide base area needed so four large chicken thighs can sit flat over the cabbage bed without piling on top of each other).
- 12-Inch Cast-Iron or Heavy Stainless Skillet: Mandatory for crisping the bacon, rendering the chicken skin, and wilting the cabbage ribbons.
- Slotted Spoon & Metal Tongs: For handling crisp bacon and flipping sizzling chicken thighs without piercing the meat.
- Digital Instant-Read Meat Thermometer: (A digital probe ensures your chicken thighs hit that tender, gelatinized sweet spot between 175°F and 185°F).
The Ingredient Breakdown
| Component | Ingredient | Quantity | Practical Role |
| The Star Poultry | Bone-In, Skin-On Chicken Thighs | 4 large thighs (approx. 2 to 2.5 lbs total) | Packed with rich connective tissue; braises into tender, juicy meat. |
| The Smoky Crunch | Thick-Cut Applewood Smoked Bacon | 5 to 6 strips (diced into ½-inch bits) | Renders savory cooking fat and adds smoky, crispy contrast on top. |
| The Vegetable Bed | Fresh Green Cabbage | 1 medium head (approx. 2 lbs, cored and chopped into 1.5-inch ribbons) | Melts down into sweet, buttery, tender ribbons during the braise. |
| Aromatic Base | Sweet Yellow Onion | 1 medium (halved and thinly sliced) | Sweats down with the cabbage to provide natural sweetness and body. |
| Aromatic Punch | Fresh Garlic Cloves | 4 to 5 cloves (minced) | Delivers pungent, savory depth to the pan drippings. |
| Acid Balance | Raw Apple Cider Vinegar | 1.5 tbsp | Crucial acidity that cuts through heavy chicken and bacon fats. |
| The Braising Base | Low-Sodium Chicken Bone Broth | ⅓ cup | Minimal liquid needed to generate steam without drowning the cabbage. |
| Flavor Booster | Dijon Mustard | 1 tbsp | Emulsifier that adds gentle tang and marries with the cabbage. |
| Richness Engine | Better Than Bouillon Roasted Chicken Base | 1 tsp | Secret weapon for deep, golden rotisserie-style flavor. |
| Herbal Backbone | Fresh Thyme Leaves (or Dried Thyme) | 1 tbsp fresh (or 1 tsp dried) | Classic rustic herbal note that perfumes the slow braise. |
| Warm Accent | Caraway Seeds (Optional) | ½ tsp (lightly crushed) | Traditional European pairing that brings an earthy, floral anise note to cabbage. |
| Poultry Rub | Garlic Powder, Onion Powder, Smoked Paprika | 1 tsp each | Forms a savory dry rub on the chicken skin before searing. |
| Base Seasoning | Coarse Kosher Salt & Coarse Black Pepper | 1.5 tsp salt, 1 tsp cracked black pepper | Crucial seasoning across the chicken, bacon, and cabbage layers. |
| Finishing Touch | Unsalted Butter | 2 tbsp (cubed) | Melted over the hot cabbage at the end for a silky, rich mouthfeel. |
Step-by-Step Cooking Instructions
Step 1: Crisp the Bacon and Save the Liquid Gold
Set your 12-inch heavy skillet over medium heat.
Add your diced thick-cut bacon.
Cook gently for 6 to 8 minutes, stirring occasionally with a wooden spatula, until the bacon renders out its fat and turns deeply browned and crispy.
Use a slotted spoon to transfer the crisp bacon nuggets to a paper-towel-lined plate.
Pour all the rendered bacon fat into a heatproof measuring cup.
Add 1.5 tablespoons of that bacon grease back into the hot skillet and keep the pan on medium heat.
Reserve the rest of the grease on the counter.
Step 2: Season and Hard-Sear the Chicken Thighs
Take your chicken thighs out of the refrigerator 20 minutes before cooking to take the deep chill off.
Trim away any ragged, wide flaps of loose skin hanging past the edges of the bone, but keep the top skin cap firmly intact.
Pat the chicken completely bone-dry on all sides with paper towels.
In a small ramekin, mix together the garlic powder, onion powder, smoked paprika, 1 teaspoon of kosher salt, and ½ teaspoon of coarse black pepper.
Rub this dry spice blend generously all over the chicken thighs, coating both the meaty underside and the skin.
Turn your skillet heat up to medium-high.
Once the bacon grease shimmers, place the chicken thighs into the skillet skin-side down.
The Golden Sear Rule: Leave them untouched for 5 full minutes!
Do not wiggle or press them.
You want direct heat to render the subcutaneous fat under the skin, crisping it into a deep, mahogany-golden crust.
Flip the thighs using tongs and sear the meaty underside for just 2 minutes.
Transfer the seared chicken thighs to a clean plate and tent loosely with foil.
Do not clean the skillet!
Step 3: Wilt the Cabbage and Deglaze the Skillet
Add another tablespoon of reserved bacon grease to the hot skillet.
Add your sliced sweet yellow onion and minced fresh garlic.
Cook for 2 minutes until the onions soften slightly.
Add the chopped green cabbage ribbons in two batches, along with the apple cider vinegar, Dijon mustard, Better Than Bouillon, fresh thyme, caraway seeds, ½ teaspoon of kosher salt, and ½ teaspoon of black pepper.
Toss the cabbage continuously with tongs for 3 to 4 minutes over medium heat.
As the vinegar hits the hot skillet, use your wooden spatula to scrape up all the savory browned chicken and bacon fond from the bottom of the pan.
The cabbage will shrink in volume by roughly a third, turning glossy and bright green while soaking up all those savory pan drippings.
Pour in the ⅓ cup of chicken bone broth and stir well to combine. Remove the skillet from the heat source.
Step 4: Layer and Load the Slow Cooker
Take your 6-quart oval slow cooker insert.
- The Cabbage Bed: Transfer the entire warm cabbage and onion mixture, along with its concentrated skillet pan juices, into the bottom of the slow cooker, spreading it into an even, level bed.
- Nestle the Chicken: Arrange the four seared chicken thighs in a single layer directly on top of the cabbage bed, skin-side facing UP.
- The Air Gap: Press the thighs down very gently into the cabbage, but make sure the crispy golden skin caps sit entirely above the cabbage and any pan juices. Keeping the skin elevated out of the braising liquid ensures it stays crisp rather than steaming into rubber.
- The Butter Dots: Dot the 2 tablespoons of cubed cold butter around the edges of the cabbage bed. As it melts, it will enrich the braising liquid into a silky sauce.
Crucial Check: Notice how little liquid is in the pot! There should only be a thin layer of broth at the very base. As the cabbage warms, it will naturally release sweet vegetable juices to braise the meat to perfection.
Step 5: The Low-and-Slow Braise
Clamp the heavy lid onto your slow cooker.
- Low Setting (Strongly Recommended): Cook for 4.5 to 5 hours.
- High Setting: Cook for 2.5 to 3 hours.
The Non-Negotiable Rule: Keep the lid closed! For the first three hours, do not lift the lid to check on things. Every time you pull the lid off, you release the trapped thermal pressure, extending your cook time by 20 minutes.
Around the 4.5-hour mark on Low, slide an instant-read probe thermometer into the thickest part of a chicken thigh:
- Target Reading: 175°F to 185°F (80°C to 85°C).
Unlike chicken breasts, bone-in chicken thighs taste best when cooked past 175°F. At this temperature, the connective tissue around the joint completely melts into gelatin, leaving the meat juicy, succulent, and fall-apart tender.
Pierce the cabbage with a fork: it should be soft, buttery, and translucent, with a sweet, mellow aroma.
Step 6: The Quick Broiler Crisp (Optional but Elite)
If you want the chicken skin to have that deep, blistered, crackling crunch:
- Carefully lift the chicken thighs out of the slow cooker with a wide metal spatula and place them onto a rimmed baking sheet.
- Slide the tray under your oven’s BROIL (High) setting for 2 minutes until the skin bubbles, crackles, and turns deep amber-bronze.
- Return the crisped thighs right back onto the cabbage bed in the slow cooker.
Step 7: Crown with Bacon and Table Service
Switch your slow cooker to the “WARM” setting.
Scatter your reserved crispy bacon nuggets generously across the top of the cabbage and around the golden chicken thighs (exactly as pictured in the reference photo).
Grind extra coarse black pepper over the top.
Let the dish rest with the lid off for 5 minutes before serving.
This brief pause lets the bubbling pan juices settle and allows the cabbage to absorb the melted butter and chicken drippings.
Serve hot straight from the rustic slow cooker!
Use a large serving spoon to scoop a generous mountain of buttery, savory braised cabbage onto wide dinner plates, set a crispy seared chicken thigh right on top, and spoon those rich, smoky pan juices all around the meat.
Practical Troubleshooting & Common Mistakes
- “My cabbage was flooded with water.”
This happens if you added too much broth at the start. Remember, cabbage is mostly water! Stick strictly to ⅓ cup of liquid. If you open the crock and see too much broth, use a ladle to spoon off excess liquid, or switch the slow cooker to High with the lid off for 15 minutes to reduce the sauce. - “The chicken skin turned soft during cooking.”
This happens if the chicken was submerged in the cabbage, or if you skipped the hard skillet sear. Always sear the skin for 5 minutes in bacon grease before slow-cooking, and always place the thighs on top of the cabbage, skin-side up, so they stay out of the liquid. - “The cabbage tasted bland or flat.”
Cabbage needs salt and acid to wake up its natural sweetness. If your finished dish tastes dull, splash a teaspoon of apple cider vinegar or a squeeze of fresh lemon juice directly over the cabbage right before serving, and finish with a pinch of flaky sea salt.
Delicious Upgrades & Variations
While this classic bacon, cabbage, and chicken combination is peasant comfort food at its finest, you can easily customize the flavors:
- The Smoked Kielbasa Feast: Slice 12 ounces of smoked Polish kielbasa or andouille sausage into coins, brown them with the bacon, and toss them into the cabbage bed alongside the chicken thighs.
- The German Apple & Onion Twist: Thinly slice 1 crisp Honeycrisp or Granny Smith apple and sauté it alongside the onions in Step 3. The tart, sweet apple balances the salty bacon and savory chicken juices.
- The Creamy Mustard Finish: During the final ten minutes of cooking, stir 2 tablespoons of heavy cream and 1 extra tablespoon of whole-grain coarse mustard directly into the braised cabbage.
What to Serve with Braised Cabbage and Chicken
This dish is a hearty, low-carb meal on its own, but it pairs naturally with comforting, rustic accompaniments that can catch the savory bacon juices:
- Boiled or Roasted Baby Red Potatoes: Tossed with butter and fresh parsley, simple waxy potatoes are the ultimate traditional pairing for braised cabbage.
- Warm Crusty Rye or Sourdough Bread: Slathered with salted butter, crusty sourdough is essential for mopping up every drop of that smoky, golden pan jus.
- Crisp Pickled Cucumbers or Radishes: A quick refrigerator pickle provides a bright, crunchy contrast that cuts through the rich chicken and bacon fat.
- A Dry Hard Cider or Crisp Pilsner: The crisp, tart fruit notes in dry cider or the clean bitterness of a German pilsner cut through the richness of the poultry and bacon fats.
Storing and Reheating Leftovers (The Next-Day Secret)
Here is a wonderful truth about braised cabbage: it tastes even better the next day. As it chills in the refrigerator overnight, the cabbage absorbs the smoky bacon fat and chicken drippings, becoming even sweeter and more tender.
Transfer leftovers to an airtight glass container and store in the refrigerator for up to 4 days.
Avoid reheating in the microwave if you want to keep the chicken skin pleasant! The microwave turns chicken skin soggy and rubbery.
Instead, use your oven or toaster oven:
- Place the braised cabbage and chicken thighs in a small oven-safe dish.
- Spoon a tablespoon of chicken broth or water around the cabbage to generate steam.
- Keep the chicken skin exposed and warm in a 375°F (190°C) oven for 12 to 15 minutes until heated through and the skin is sizzling and crisp again.
Serve warm and enjoy an effortless, rustic comfort feast all over again!