
Introduction: When a Healthy Appetizer Idea Goes Terribly Wrong
Let me take you back to a game-day weekend a few months ago. I wanted to whip up a fun, bite-sized appetizer that looked impressive but felt relatively light. I spotted a colorful bag of sweet mini bell peppers in my crisper drawer, along with some ground beef and cheese, and figured, Hey, stuffed mini peppers! How hard can it be? Just slice the peppers in half, stuff them with raw beef and cheese, and throw them in the oven.
What followed was a culinary catastrophe.
Without checking a proper recipe, I sliced the raw mini peppers in half, packed raw ground beef straight into the hollow cavities, piled pre-shredded cheese on top, and shoved the baking sheet into a hot oven.
Twenty minutes later, my kitchen smelled like hot, boiling vegetation and scorched cheese.
When I pulled the baking sheet out, the disaster was complete. Because bell peppers are packed with water, the raw peppers released an absolute flood of liquid as they baked. The baking sheet turned into a swampy, watery soup where the peppers turned into mushy, waterlogged boats. Meanwhile, the raw ground beef inside was gray and greasy, and the cheese had baked into a tough, rubbery plastic sheet across the top.
My husband took one polite bite, chewed for a very long time, and gently asked if we had any frozen snacks in the garage.
That kitchen catastrophe bruised my ego, but it also made me obsessed. I refused to let mini peppers defeat me. I spent the next few weeks testing, tweaking, and completely redesigning how to pre-cook the beef filling, roast the pepper boats so they stay tender-crisp, and melt the cheese into golden perfection.
Today, I am sharing the glorious result of that journey: my absolute favorite Cheesy Stuffed Mini Peppers. They are savory, cheesy, loaded with seasoned beef, and once you know the secret steps, completely foolproof. Grab a baking sheet and let’s dive in.
The Reality Check: Why Most Homemade Stuffed Peppers Turn Out Watery
Before we get to the fun part of cooking, we need to talk about why making stuffed vegetable boats at home can feel like walking through a minefield.
Have you ever tried stuffing peppers with raw meat and baking them, only to find that the pan is swimming in a watery liquid and the peppers are soggy? Or have you watched your cheese separate into an oily grease slick?
I made every single one of those mistakes so you don’t have to repeat them. Here are the three golden rules I learned the hard way:
- Pre-cook and drain your ground beef. Never put raw meat inside mini peppers. Always brown and drain your beef on the stovetop first to remove excess grease so your peppers don’t drown in oil.
- Pre-roast your pepper boats. Giving the empty mini pepper halves a quick 5-minute roast in the oven before filling them draws out excess moisture and ensures they stay tender-crisp instead of turning into mush.
- Grate your own cheese. Pre-bagged shredded cheese is coated with anti-caking starches that prevent smooth melting. Grating your own mozzarella and cheddar from a block guarantees a stretchy, golden cheese pull.
With those hard-earned lessons tucked under our aprons, let’s look at what you need to stock your kitchen counter with.
The Ingredient List
For an appetizer or finger-food snack that tastes like an upscale bistro creation, the ingredient list is surprisingly straightforward. You can find everything easily at your local grocery store.
| Category | Item | Quantity / Notes |
| The Peppers | Sweet Mini Bell Peppers | 1.5 lbs, assorted colorful red, yellow, and orange peppers, sliced in half lengthwise and seeded. |
| The Meat Filling | Ground Beef | 1 lb (80/20 lean-to-fat ratio; browned and drained). |
| Yellow Onion & Garlic | 1 medium yellow onion (diced) + 3 cloves garlic (minced). | |
| Seasoning & Bind | Cream Cheese | 3 oz, softened (the secret ingredient that binds the beef filling into a rich, creamy mixture). |
| Taco Seasoning or Italian Seasoning | 1 tablespoon (adds incredible depth and savory flavor). | |
| The Cheese Topping | Mozzarella & Cheddar Cheese | 2 cups total, freshly shredded from a block (half mozzarella for stretch, half cheddar for sharpness). |
| Fresh Parsley | 2 tablespoons, chopped, for a vibrant green garnish. |
Step-by-Step Guidance: Building Your Masterpiece
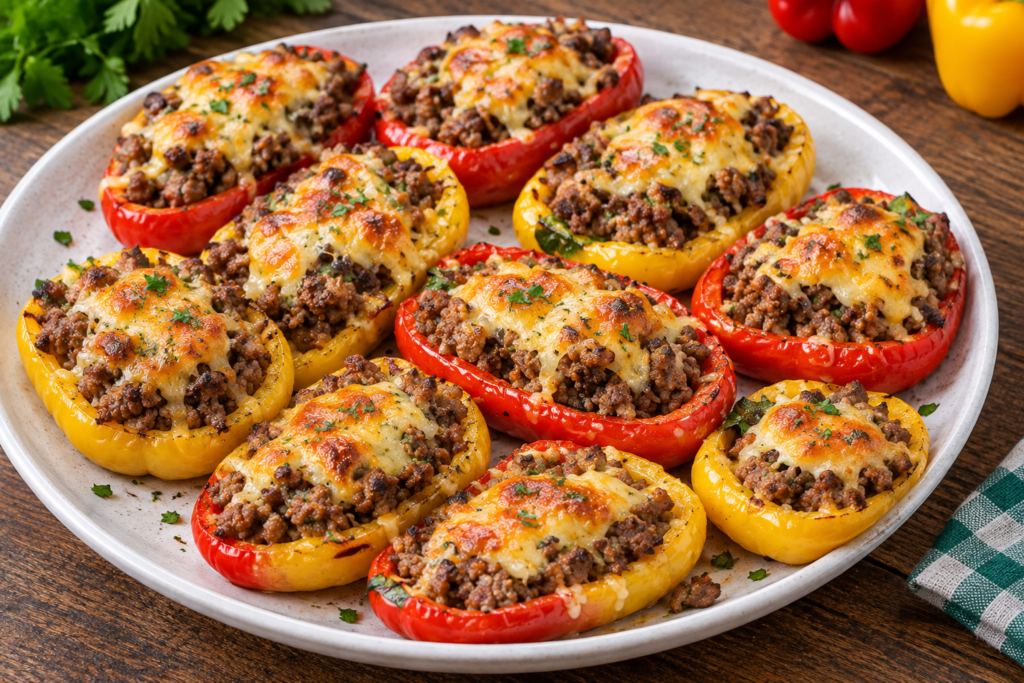
Ready to get to work? Make sure you have a baking sheet ready (just like the white serving platter in our reference image). Let’s walk through the process step by step.
Step 1: Prep and Pre-Roast the Peppers
- Slice and Seed: Wash your mini bell peppers, slice them cleanly in half lengthwise, and scrape out all the seeds and white membranes.
- Pre-Roast: Arrange the pepper halves on a parchment-lined baking sheet. Roast them in a preheated oven at 400°F (200°C) for just 5 to 7 minutes. This pre-roasting step softens them slightly and evaporates excess water. Remove from the oven.
Step 2: Brown the Beef and Make the Filling
- Stovetop Sauté: In a skillet over medium-high heat, cook your ground beef and diced yellow onion until the beef is thoroughly browned. Drain off any excess grease in a colander.
- Create the Creamy Blend: Return the beef and onions to the warm skillet over low heat. Stir in your minced garlic, seasoning blend, and softened cream cheese. Stir until the cream cheese melts completely, binding the beef into a rich, savory mixture.
Step 3: Stuff and Top the Peppers
- Spoon the warm, creamy beef mixture evenly into each pre-roasted mini pepper half, packing it down gently.
- Blanket the stuffed peppers generously with your freshly shredded mozzarella and cheddar cheese blend.
Step 4: Bake to Golden Perfection
- Return the baking sheet to your 400°F (200°C) oven and bake for 10 to 12 minutes, or until the cheese is melted, bubbling furiously, and golden-brown on top.
- Switch your oven to Broil for the final 1 minute if you want an extra-toasted, golden cheese crust.
- Scatter freshly chopped parsley across the top for a vibrant pop of color, transfer them to a clean serving platter, and serve warm!
Real Examples, Use Cases, and Life Lessons
Even seasoned home cooks run into roadblocks. Here are a few practical scenarios and common traps to keep in mind so your dinner goes off without a hitch:
- The Watery Pan Trap: Skipping the pre-roasting step for the peppers will leave your baking sheet swimming in water. Always give the empty pepper boats a 5-minute head start in the oven.
- Choosing the Right Peppers: Look for mini bell peppers that are firm, glossy, and relatively uniform in size so they bake evenly on your sheet pan.
- Leftovers and Reheating: Leftover stuffed peppers can be stored in an airtight container in the fridge and reheated in a toaster oven or air fryer at 350°F for 5 minutes to restore their crisp texture.
As for serving suggestions? Pile these colorful, cheese-topped stuffed mini peppers high on a white serving platter for your next party, game day gathering, or as an easy weeknight side dish. They are bite-sized, flavorful, and guaranteed to disappear instantly!
Common Mistakes to Avoid Summary
To ensure your Cheesy Stuffed Mini Peppers turn out tender-crisp, flavorful, and stunning on your very first try, keep these quick checkpoints handy:
- Don’t skip pre-roasting: Roast the empty pepper halves for 5 minutes to remove excess moisture and prevent a soggy dish.
- Don’t use raw meat: Always pre-cook and drain your ground beef before mixing it with cream cheese and stuffing the peppers.
- Don’t use pre-shredded cheese: Grate your own cheese blocks to guarantee a smooth, stretchy, golden cheese melt.
Final Thoughts
That disastrous game-day pepper failure feels like a lifetime ago now. Making an incredible, crowd-pleasing appetizer at home isn’t about guesswork; it’s about managing your moisture levels and layering rich flavors.
Next time you need a party snack or appetizer that will wow your guests, skip the stress and spend 25 minutes making these Cheesy Stuffed Mini Peppers.
Take your time pre-roasting your peppers, load them up with creamy beef and cheese, and enjoy every single savory bite. Happy cooking!